Changing Table Properties
Select a table and click 'Custom Properties' in the Ribbon to display the 'Edit Table Properties' dialog box. Alternatively, right-click the table and select 'Custom Properties' from the displayed menu to display this dialog box.
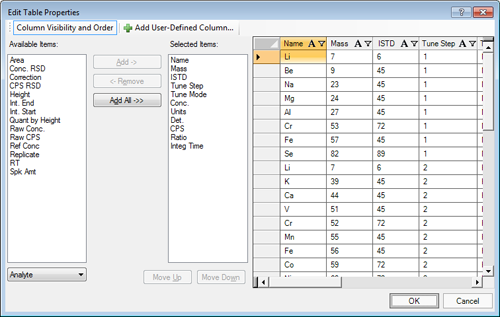
In this dialog box, you can delete, add, or sort the columns displayed in the table. The table on the right side lists the items and data to be displayed in a report.
Deleting Columns
To delete columns, select items to be deleted from the 'Selected Items:' list and click '<-Remove'.
Adding Columns
To add columns, select items to be added from the 'Available Items:' list and click 'Add->'.
To add a new column that is not in the 'Available Items:' list, click the 'Add User-Defined Column' tab to open the 'User Defined Settings' dialog box and define the column in the dialog box. For more information, see "Adding a User-Defined Column".
Changing the Display Order of Columns
In the 'Selected Items:' list, items are listed in the display order of the items. To change the display order of a column, select the relevant item to be changed in the 'Selected Items:' list and click 'Move Up' or 'Move Down' to move the item.
You can also change the display order of a column by dragging and dropping the relevant item name in the right-side table.
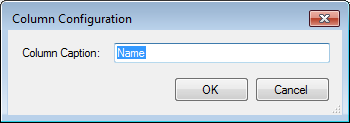
Changing an Item Name
To change the item name displayed in the header of a column, click the
![]() icon in the column header
on the right-side table to open the 'Column Configuration' dialog box,
enter a new item name in the dialog box, and then click 'OK'.
icon in the column header
on the right-side table to open the 'Column Configuration' dialog box,
enter a new item name in the dialog box, and then click 'OK'.
Filtering Columns
To filtering a column, click ![]() in the column header
on the right-side table and select (All), (Custom), (Blanks), or (Non
Blanks). This function provides operations similar to the filtering function
in Excel.
in the column header
on the right-side table and select (All), (Custom), (Blanks), or (Non
Blanks). This function provides operations similar to the filtering function
in Excel.
When '(Custom)' is selected, the 'Custom Filter' dialog box is displayed. In this dialog box, you can define your own filter.
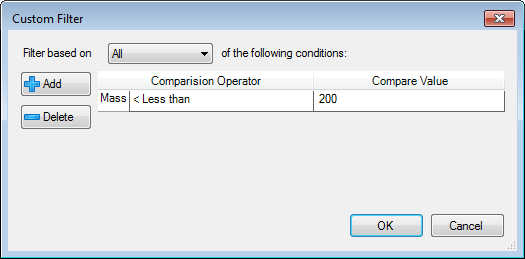
The above example shows a filter setting for displaying only data whose
mass is less than 200.
After a column is filtered, the icon of the column header changes to ![]() .
.
Sorting Data
To sort data in columns, click an item name in the right-side table
to open the 'Sort' dialog box and specify the sort settings in
the dialog box.
Click 'Add Level', specify the sort priority order, and select 'Ascending'
or 'Descending'.
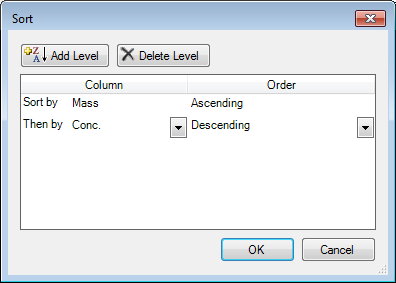
The above example shows settings for sorting 'Mass' in 'Ascending' order and then sorting 'Conc.' in 'Descending' order.
Adding a User-Defined Column
You can add a user-defined column and configure data to be displayed in the column. To add a user-defined column, click the 'Add User-Defined Column' tab in the 'Edit Table Properties' dialog box to open the 'User Defined Settings' dialog box and configure the column in the dialog box.
You can define a user-defined column by dragging and dropping items to be displayed from the 'Operands' tab.
In addition, you can enter a formula by using the operator buttons listed at the bottom of the 'Formula Builder' control group to display operation results in the column.
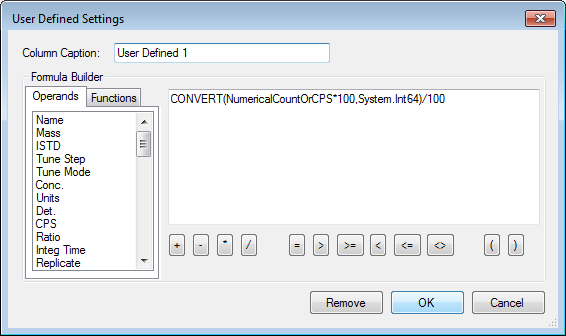
You can also use the functions in the 'Functions' tab. The above example shows settings for defining a column that displays Raw CPS counts to two decimal places.
When a user-defined column is configured, the user-defined column is
added in the right-side table on the 'Edit Table Properties' dialog
box and the ![]() icon is displayed on the column header. To change the definition of the
column, click this icon.
icon is displayed on the column header. To change the definition of the
column, click this icon.
User Defined Settings Dialog Box
We explain the functions of 'User Defined Settings' dialog box.
Column Caption
This is used to enter a caption for the User Defined Column.
'Operands' tab
Drag & drop items that you want to display in the User Defined Column to the input field.
'Functions' tab
This can be used to display the result of a function used in the User Defined Column.
You can use the following functions.
CONVERT
Description: Converts given expression to a specified .NET Framework Type.
Syntax: Convert(expression, type)
Arguments: expression-- The expression to convert, type-- The .NET Framework type*1 to which the value will be converted.
Example: Display the concentration as an integer.
CONVERT(NumericalConcentration, System.Int32)
Example: Display the concentration as 4 digits after the decimal point.
CONVERT(CONVERT(NumericalConcentration*10000,
System.Int64), System.Double)/10000
*1 The following shows typical Framework types. For more information, refer to .NET Framework information provided by Microsoft.
- System.String [String]
- System.Int32 [32 bit signed integer]
- System.Int64 [64 bit signed integer]
- System.Double [Double precision real number]
- System.Single [Single precision real number]
LEN
Description: Gets the length of a string.
Syntax: LEN(expression)
Arguments: expression-- The string to be evaluated.
Example: Display the number of characters in element names; 2 for Na, 1 for Y.
LEN(CompoundName)
ISNULL
Description: Checks an expression and either returns the checked expression or a replacement value.
Syntax: ISNULL(expression, replacementvalue)
Arguments: expression-- The expression to check, replacementvalue-- Replacementvalue is returned if expression is a null reference.
Example: Display N/A when the concentration is empty.
ISNULL(NumericalConcentration, 'N/A')
IIF
Description: Gets one of two values depending on the result of a logical expression.
Syntax: IIF(expr, truepart, falsepart)
Arguments: expr-- The expression to evaluate, truepart-- The value to return if the expression is true, falsepart-- The value to return if the expression is false.
Example: Display <100 if the CPS is less than 100; otherwise, display CPS as an integer.
IIF(NumericalCountOrCPS<100, '100', CONVERT(NumericalCountOrCPS,System.Int64))
TRIM
Description: Removes all leading and trailing blank characters like \r, \n, \t, ' '.
Syntax: TRIM(expression)
Arguments: expression-- The expression to trim.
Example: Trim the element names.
TRIM(CompoundName)
SUBSTRING
Description: Gets a sub-string of a specified length, starting at a specified point in the string.
Syntax: SUBSTRING(expression, start, length)
Arguments: expression-- The source string for the substring, start-- Integer that specifies where the substring begins, length-- Integer that specifies the length of the substring.
Example: Display initial character of detector modes.
SUBSTRING(DetectorMode,1,1)
Text box
Enter a text string or an item that you want to display in the User Defined Column. To display the result, enter a formula by using the Operator button below or the 'Functions' tab.
Functions of the Operator button
'+' :Add, '-' :Subtract, '*':Multiply, '/': Divide
'=' :Equal to, '>' :Greater Than, '>=' :Greater Than or Equal to, '<' :Less Than, '<=' :Less Than or Equal to, '<>': Not Equal to
'(': Open Parentheses, ')': Close Parentheses
'OK' button
Sets the definition for the User Defined Column. The User Defined Column is added in the report table.
You can change the user defined column in the 'Edit Table Properties' dialog box.
'Cancel' button
Cancels creating a definition for the User Defined Column.