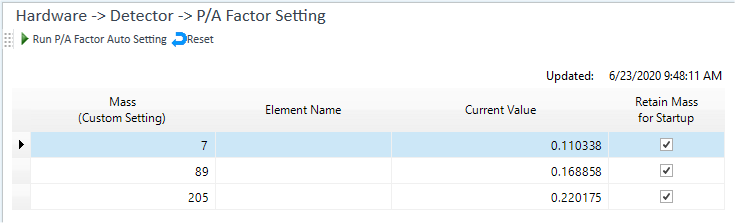
P/A Factor Setting Pane
This section describes the functions in the P/A Factor Setting pane.
Toolbar
Task Settings Toolbar

Drag  to move the toolbar.
 Starts automatic
adjustment of P/A Factor after the signal is stabilized. The values specified
in the Startup Pane are used for the
monitored mass and vial position. When the configuration is completed,
the measured values are displayed in the [Current Value] column on the
table.
Starts automatic
adjustment of P/A Factor after the signal is stabilized. The values specified
in the Startup Pane are used for the
monitored mass and vial position. When the configuration is completed,
the measured values are displayed in the [Current Value] column on the
table.
 Clear the measured values in the [Current Value]
column. Use this function to adjust the P/A Factor without combining the
latest data.
Clear the measured values in the [Current Value]
column. Use this function to adjust the P/A Factor without combining the
latest data.
Context Menu
This section describes the commands available in the context menu that is displayed when you right-click in this pane. The commands that are not listed below have the same function as their counterparts on the toolbars.
[Select Masses]
The [Select Elements on Periodic Table] dialog box is displayed, which lets you specify the masses to monitor.
[Load Mass List from Method]
Load the masses from the method. The [Select Batch Folder] dialog box is displayed, which lets you select the method.
[Merge]
If the P/A factors have not been adjusted yet, this menu is hidden.
If this menu item is selected, the mass acquired the first time is not acquired the second time. If this item is not selected, all masses are acquired each time.
Also, if this menu item is selected, P/A factors acquired with a batch are merged.
[Export Table]
Opens the [Export Table] (Entire Table) dialog box where you can export the entire table. This command is available when a pane that includes a table is selected.
[Print]
Opens the [Print] dialog box where you can print the contents of the selected pane.
Setup Table
Displays the acquired masses and results for the P/A Factors.
[Mass (Custom Setting)] Column
Displays the masses.
To load masses from the method, right-click on the table to display the context menu then select [Load Mass List from Method]. The [Select Batch Folder] dialog box is displayed, which lets you select the method.
If [Select Masses] is selected, the [Select Elements on Periodic Table] dialog box is displayed, which lets you specify the masses to monitor.
[Element Name] Column
Displays the element names of the masses.
[Current Value] column
Displays the measured values after an automatic adjustment is performed.
[Retain Mass for Startup] column
Mark the masses for which you want to adjust the P/A factor during startup.
Tuning P/A Factors
If a batch is executed that includes high concentration samples, both Analog and Pulse modes may be used during acquisition.
Usually a standard solution that includes all analytes in your sample and that is used as one of the standard solutions for calibration curves is used for tuning P/A Factors. Adjust the concentration so that the counts of elements can be 560,000 cps or more. When using normal torch, the concentrations are normally around 100 ng/mL (ppb). Before you do P/A Factor tuning, perform EM tuning using Autotune.
Perform the P/A Factor adjustment after EM tuning.
To Get Here
Click [Dashboard] from the [Hardware] group in the Task Navigator, and then select [P/A Factor Setting] from [Detector].
Click [P/A Factor Setting] from the [Hardware] group in the Task Navigator. If the menu is not currently displayed, select the [Detector] check box on the Dashboard Pane.