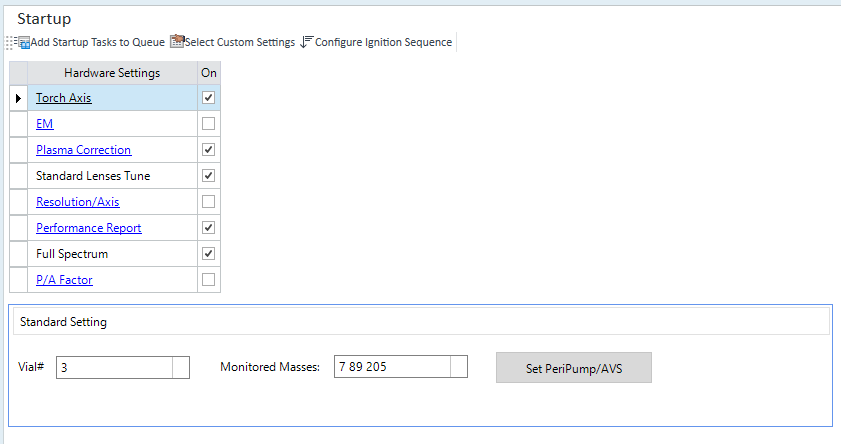
Startup Pane
This section describes the functions of the commands that are available in the Startup pane. The Startup pane lets you select from a range of predefined Hardware Optimization settings that are available to run automatically when the plasma ignites. The tasks that you mark are run in the order that they appear, after an appropriate warm up delay time, which is displayed in the status bar.
Each Startup item works properly for the following standard nebulizers:
For x-lens: MicroMist and Mira Mist nebulizers
For s-lens: MicroMist and Microflow (200) nebulizer
For m-lens: Microflow (200) nebulizer
If you use another nebulizer, do not execute a Startup to adjust each item at this stage. After plasma ignition, perform a custom tune to adjust the items in each batch.
In the following cases, a Startup containing each item selected in the hardware settings cannot be executed with Standard Tune. Instead, import a tune mode from a preset batch into User Tune. For more information, refer to the "User Tune Pane".
Sample Introduction is set to [Agilent LC], [Agilent GC], or [LA].
Plasma Ignition Mode is set to [Organic solvent].
For more information, see Reference > Plasma Correction.
Title Bar
The title bar buttons and the context menu have the same functions as the Title Bar of the Instrument Status Pane.
Toolbar
Task Settings Toolbar

Drag  to move the toolbar.
 Adds the configured
hardware settings to the Queue and starts the tuning.
Adds the configured
hardware settings to the Queue and starts the tuning.
 When this
is ON, the custom setting column is added, which lets you specify each
item for the vial number, masses to be monitored, and peristaltic pump.
To restore the standard setting, click this again to turn it OFF.
When this
is ON, the custom setting column is added, which lets you specify each
item for the vial number, masses to be monitored, and peristaltic pump.
To restore the standard setting, click this again to turn it OFF.
 Displays the
[Configure
Ignition Sequence] dialog box, which lets you set options for plasma
ignition.
Displays the
[Configure
Ignition Sequence] dialog box, which lets you set options for plasma
ignition.
Pane Functions
Specifies the items to be adjusted.
[Hardware Setting] Column
Displays the items to be adjusted. For the standard settings, the items set here are used for all batches.
[Torch Axis]
Adjusts the torch axis automatically.
Link to Torch Axis Setting Table.
[EM]
This instrument uses an electron multiplier (EM) as a detector. This function automatically adjusts the voltage applied to the EM.
Link to EM Setting Pane.
[Plasma Correction]
Does a plasma adjustment to optimize the Plasma Correction.
Link to Plasma Correction Pane.
In the following cases, plasma correction can be done.
Ion Lenses is [x-Lens] and Nebulizer is [MicroMist] or [Mira Mist].
Ion Lenses is [s-Lens] and Nebulizer is [MicroMist] or [Micro Flow(200)].
Ion Lenses is [m-Lens] and Nebulizer is [Micro Flow(200)].
[Standard Lenses Tune]
Automatically adjusts the ion lens to the basic performance status.
When [User Tune] is selected as the [Load Option], the title displays [Lens Tune].
When User Tune is set as the load option, link to User Tune Pane.
[Resolution/Axis]
Adjusts the resolution and axis automatically to get a good peak shape in mass spectra.
Link to Resolution / Axis Setting Pane.
[Standard Resolution/Axis]
"Standard Resolution/Axis" performs Resolution/Axis Auto Setting and calibration for high mass.
"Standard Resolution/Axis" is only displayed when the connected instrument is an N8421A / N8403A model and the Unlock Key is not installed.
[Performance Report]
Does a performance measurement and displays the result in a graph in the Performance Report Pane.
Link to Performance Report Pane.
In the previous version, the parameters for Performance Report in Hardware Settings are used for auto tune and tune report. These are always used for the parameters in the batch.
[Full Spectrum]
Acquires the full spectrum data across all masses. The obtained full spectrum data is saved under the \Agilent\ICPMH\1 folder. To view the data, import it into any batch that is opened in the Data Analysis window.
[P/A Factor]
Automatically adjusts the P/A factor in no gas mode that is used to convert from Analog mode to Pulse mode in an analysis of high concentration samples. To obtain more reliable results, adjust the P/A factors in each batch rather than in Startup.
Link to P/A Factor Setting Pane.
[On] Column
Mark the check boxes for items to execute in Startup.
[Vial#] Column
This column is displayed for a custom setting. Set the vial position of the tuning solution. For [P/A Factor], multiple vial positions can be specified.
You can set [HOME] position from the dropdown menu. In other cases, click [<Vial#>] to open a dialog box, and then select a vial in the dialog box. You can directly enter a vial number from the keyboard into the [<Vial#>] column.
When no Autosampler is used, <Manual> is displayed. Follow the instruction messages to replace the tuning solution.
[Tune/ISTD Valve] Column
When AVS is set, this column is displayed for a custom setting.
[Monitored Masses] Column
This column is displayed for a custom setting and allows you to set the monitored masses. You can make changes to values in the white cells but not the gray cells.
Clicking ![]() opens the [Select
Monitored Masses] dialog box, which lets you specify up to 3 masses
to monitor. For [P/A Factor], any number of monitored masses can be specified.
opens the [Select
Monitored Masses] dialog box, which lets you specify up to 3 masses
to monitor. For [P/A Factor], any number of monitored masses can be specified.
On the [Performance Report] row, you can set the monitored masses of oxide ions and doubly-charged ions.
When you select elements to use for hardware optimization, ensure that the chosen elements give a stable signal within the range of the pulse count detector mode. Note in particular that hardware auto optimization may fail if you select an element whose signal is too high.
[PeriPump] Column
This column is displayed for a custom setting. Configure the peripump in the [PeriPump Setting] dialog box.
[Standard Setting] Table
Lets you configure the standard settings of Startup. This table is not displayed for a custom setting.
[Vial#]
Set the vial position of the tuning solution when you use the autosampler.
You can set [HOME] position from the dropdown menu. In other cases, click [<Vial#>] to open a dialog box, and then select a vial in the dialog box. You can directly enter a vial number from the keyboard into the [<Vial#>] column.
[Tune/ISTD Valve]
When AVS is set, this item is displayed even if custom setting is turned on.
Pre Run is executed for AVS in the first startup task, and Post Run is executed in the last startup task regardless of whether custom setting is turned on/off. This means that startup tasks have common AVS settings and need to skip duplicated (unnecessary) uptakes.
[Monitored Masses]
Click ![]() to open the [Select
Monitored Masses] dialog box, which lets you select up to 3 masses
to monitor. The defaults are "7 89 205".
to open the [Select
Monitored Masses] dialog box, which lets you select up to 3 masses
to monitor. The defaults are "7 89 205".
[Set PeriPump/AVS] Button
Displays the [PeriPump Setting] dialog box, which lets you configure detailed settings when you use a peripump or AVS as the sample introduction.
When the same vial position is specified for multiple successive items in a Startup or hardware settings, the prerun of the peristaltic pump program is done only for the first item and the post program is done only for the last item.
Context Menu
This section describes the commands that are available in the context menu, which is displayed when you right-click in the pane. The commands that are not listed below have the same function as their counterparts on the toolbars.
[Export Table]
Opens the [Export Table] (Entire Table) dialog box, which lets you export the entire table. This command is available when a pane that includes a table is selected.
[Print]
Opens the [Print] dialog box, which lets you print the contents of the selected pane."
To Get Here
- Click [Startup Configuration] from the [Startup] group in the Task Navigator. To display the [Startup] group, click [Configuration] from the [Startup] group on the [Home] tab.