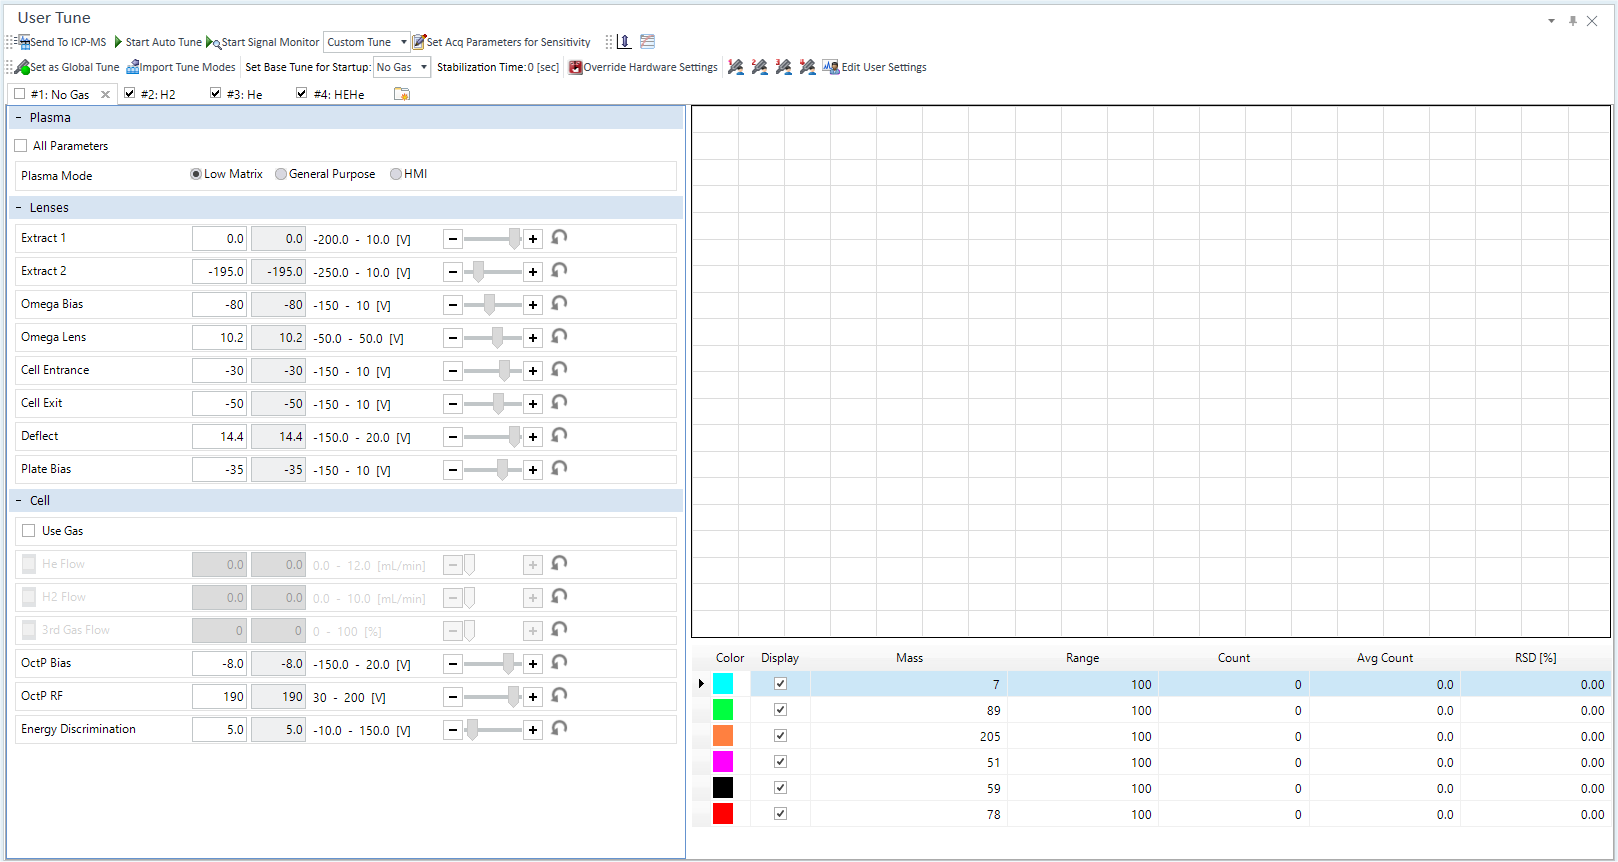
User Tune Pane
This section describes the functions of the commands that are available in the User Tune pane.
Title Bar
The functions of the buttons and the context menu on the title bar are the same as the Title Bar in the Instrument Status Pane.
Toolbar
Task Setting Toolbar


Sends the tuning parameters to the ICP-MSICP-QQQ.
 Starts a AutoTune.
The behavior depends on the selected tune method.
When [Auto Tune] is selected
The [Start Auto Tune] dialog box is displayed. After you select whether to do all tune modes or the specified tune modes, the autotune starts.
When [Custom Tune] is selected
The [Start Semi Auto Tune] dialog box is displayed. After you select whether to do all tune modes or the specified tune modes, the semi autotune starts.
 Starts the
signal monitor for the currently selected tuning mode.
Starts the
signal monitor for the currently selected tuning mode.
When a signal monitor starts, the icon changes to  . Click
this icon if you want to stop the signal monitor.
. Click
this icon if you want to stop the signal monitor.
 Select Tune
Way.
Select Tune
Way.
 Set the masses.
The [Set Acq Parameters for Manual Sensitivity Tune] dialog box appears.
 When
the [Resolution/Axis]
Tab is selected, this button is displayed.
When
the [Resolution/Axis]
Tab is selected, this button is displayed.
The [Set Acq Parameters for Resolution/Axis] dialog box appears, which lets you set masses and the integration time.
User Tune Settings Toolbar

 When this
is on, User Tune parameters are imported and the latest user tune report
is copied to the batch when it is sent to the Queue. See Global
Tune.
When this
is on, User Tune parameters are imported and the latest user tune report
is copied to the batch when it is sent to the Queue. See Global
Tune.
 Opens the
[Import
Tune Modes from Existing Batch] dialog box, the user can import tune
modes from existing batch.
Opens the
[Import
Tune Modes from Existing Batch] dialog box, the user can import tune
modes from existing batch.
 This
is displayed when the Plasma Ignition Mode is set to [Organic Solvent].
Select the organic solvent (IPA/Kerosene/Xylene) you want to use from
the drop-down list.
This
is displayed when the Plasma Ignition Mode is set to [Organic Solvent].
Select the organic solvent (IPA/Kerosene/Xylene) you want to use from
the drop-down list.
Tune Mode Settings
- For x-lens
- For s-Lens
- For m-Lens
 User can
select base tune mode for x-Lens which is set as Ignite/Startup/HW
Setting parameters.
User can
select base tune mode for x-Lens which is set as Ignite/Startup/HW
Setting parameters.
 User
can select base tune mode for s-Lens which is set as Ignite/Startup/HW
Setting parameters.
User
can select base tune mode for s-Lens which is set as Ignite/Startup/HW
Setting parameters.

User can select base tune mode for m-Lens which is set as Ignite/Startup/HW Setting parameters.
 The user can
set Stabilization Time.
The user can
set Stabilization Time.
 When this
is on, Q-Pole, Torch, and EM parameters
are shown. The user can manually tune the parameters.
When this
is on, Q-Pole, Torch, and EM parameters
are shown. The user can manually tune the parameters.
 You can assign
a set number (four maximum) of tune modes in the User Tune task client
loaded to the batch the order of tune modes, and "Base Tune for Startup".
You can configure a set by clicking
You can assign
a set number (four maximum) of tune modes in the User Tune task client
loaded to the batch the order of tune modes, and "Base Tune for Startup".
You can configure a set by clicking  on the tool
bar. If a set is configured, the buttons (1 to 4) are enabled after each
set. Click the button to restore the set of global tune modes.
on the tool
bar. If a set is configured, the buttons (1 to 4) are enabled after each
set. Click the button to restore the set of global tune modes.
Opens the [Load
as Global] dialog box. Lets you assign the set number (four maximum)
of tune modes in the User Tune Pane loaded to the batch.
[Tune Mode] Tab

Click to switch the tune mode.
This tab button contains the following functions.
- Click the [New Sheet] tab to add a new tune mode.
- Click the [X] to display a confirmation message asking if you want to delete the tab button. Click [OK] to delete the tune mode.
- By dragging and dropping the tab button, you can change the order of the tune mode.
- Only selected tune modes are imported (loaded) to the created batch when it is sent to the Queue when [Set as Global Tune] is set to on. In this situation, if the batch's tune modes do not match those specified on the User tune pane, an error is displayed on the error list pane. You can ignore this error and save the batch. All of the tune modes in the batch are replaced with the tune modes in the User Tune Pane.
Context Menu
This section describes the commands that are available in the context menu, which is displayed when you right-click on the tab. The commands that are not listed below have the same function as their counterparts on the toolbars.
[Tune]
[Set Tune Check Criteria]
Opens the [Set Tune Check Criteria] dialog box, which lets you set the check criteria for tuning.
[Rename Tune Mode]
Lets you change the name that is displayed in the tab of the tuning mode. You can also change the name by double-clicking the tab of the tuning mode.
[Configure Tune Modes]
Opens the [Configure Tune Modes] dialog box, which lets you copy or delete the tuning mode.
[Copy Tune Parameters]
Opens the [Copy Tune Parameters] dialog box, that allows you to copy the tune parameters.
[Parameters for Auto Tune]
The [Set Acq Parameters for Auto Tune] dialog box appears.
Set the acquisition parameters for autotune or lens autotune in a custom tune.
[Set Acq Parameters for Sensitivity]
The [Set Acq Parameters for Manual Sensitivity Tune] dialog box appears.
Set the sensitivity measurement parameters for a custom tune or signal monitor for each tuning mode.
[Set Acq Parameters for Resolution/Axis]
When the [Resolution/Axis] Tab is selected, a menu appears.
The [Set Acq Parameters for Resolution/Axis] dialog box appears, which lets you set masses and the integration time.
[Set Batch Wide Parameters]
Lets you set common tune parameters across different tune modes in a batch for custom tuning. The [Set Batch Wide Parameters] dialog box is displayed.
[Show/Hide Tune Parameters]
Lets you select which tune parameters to display for a custom tune or signal monitor for each tune mode. The [Show/Hide Tune Parameters] dialog box is displayed.
[Report]
[Generate Tune Report]
Opens the [Generate Tune Report] dialog box, which lets you generate a tune report.
[Display Previous Tune Report]
Displays the previous tune report.
[Print Current Signal]
Displays sheet that contains the signals, count table, tuning parameters, tuning mode name and other information from the Real Time DisplayTable. The report can be printed from Report Designer.
The Report Template for the Current Signal Report is stored in the following path:
C:\Program Files \Agilent\ICPMH\Report\CRE\en\CurrentSignal.tune.acrt
[Display]
[Auto Scale-Y]
Automatically adjusts the scale for the Y-axis on the Real Time Display Graph.
[AVS]
This menu is enabled when you use AVS.
[Manual Operation]
Opens the [Manual Operation] dialog box for manual operations of AVS.
[Run PreRun Program]
Starts the AVS PreRun program.
[Run StartRun Program]
Starts the AVS StartRun program.
[Run PostRun Program]
Starts the AVS PostRun program.
[Stop Program]
Stops the AVS program.
[ADS 2]
Works when the Autodilution is used in ADS 2.
[Run ADS 2 Dilution Program]
[ADS 2 Dilution Program Configuration] dialog box appears. Set the dilution factor and data acquisition time and click [Start] to start the dilution program.
[Stop ADS 2 Dilution Program]
Stop the dilution program.
[Repeat Resolution/Axis]
When the [Resolution/Axis] Tab is selected, a menu is displayed.
When this menu item is selected, when you click  on the toolbar, the resolution/axis measuring starts and replicated analyses
are performed until you click .
on the toolbar, the resolution/axis measuring starts and replicated analyses
are performed until you click .
[Check Random Noise]
[Check Off Mass Background]
Starts the acquisition to check the background.
The acquisition continues until you click this menu item. The real time data is displayed in Real Time Display Graph on the right side.
[Ramp Cell Gas]
This item can be used when [Custom Tune] or [Signal Monitor] is selected on the [Configure Tune Way] dialog box. The cell gas flow is ramped and the BEC (background Equivalent concentration) is calculated at each gas flow to find the optimum gas flow rate.
The [Set Ramp Cell Gas] dialog box is displayed. After you enter the maximum and minimum values of the sweeping gas flow rate and other parameters the data acquisition starts.
[Acquire Full Spectrum]
Acquires the full spectrum within the range from 2 to 260 (except for prohibited masses) for fault diagnosis. The acquisition is done under the conditions of 1 point per mass, integration time 0.1 sec/point, and repeats 3 times. The acquired data is displayed in Real Time Display Graph and saved in the current batch.
[Precursor/Product Ion Scan]
This item is displayed in MS/MS mode. The [Precursor/Product Ion Scan] dialog box is displayed and allows you to perform the Precursor/Product Ion Scan.
[Acquire Sensitivity -Oxide Profile]
Acquires the oxide ratio profile for fault diagnosis. Although the acquired data is not displayed, the data is saved in the batch folder and can be used by Field Service Engineers for instrument diagnosis.
[Auto RF Matching]
Starts the automatic adjustment of RF matching.
Perform RF matching when the cool plasma mode is used, organic solvents are analyzed, or the torch is replaced. It helps to stabilize the plasma ignition and enhance the sensitivity.
[Clear Plot]
Clears the signals that is currently displayed on the tuning screen. Use this function to recalculate the average count or RSD.
[Export Graphics]
Opens the [Export Graphics] dialog box, which lets you export graphics data from a graphics pane in the specified file format.
[Print]
Opens the [Print] dialog box, which lets you print the contents of the selected pane.
User Tune Pane Functions
By using User Tune, you can use manually-tuned settings in the Startup instead of Standard Tune. If you have acquired data with Standard Tune and obtained satisfactory results with the standard conditions, you do not have to use User Tune.
In MassHunter, you can set only one User Tune that is always linked to the hardware settings. When MassHunter is installed, the tune parameters for Standard Tune are set as the default values.
You can edit/adjust User Tune in the same way as for the Tune Modes Pane.
The tune report for User Tune is overwritten by the latest report.
When the lens type is changed, User Tune is also reset to the default for the selected lens type. For x-Lens, [No Gas] mode is set as the [Base Tune Mode for Startup]. For s-Lens, [Hot] is set as the [Base Hot Tune Mode] and [Cool] is set as the [Base Cool Tune Mode]. For m-Lens, [Hot] is set as the [Base Tune Mode for Startup].
User Tune is automatically updated and saved. You do not have to save it manually. In the same way as for the hardware settings, when MassHunter is running, User Tune is saved in the memory and when MassHunter is closed, User Tune is saved in a physical file.
While a queue is being executed, you cannot display User Tune.
Executing Startup with User Tune
In the following cases, a Startup containing each item selected in the hardware settings cannot be executed with Standard Tune. Use the User Tune to execute a Startup. For more information, refer to the User Tune Pane.
- Sample Introduction is set to [Agilent LC], [Agilent GC], or [LA].
- Plasma Ignition Mode is set to [Organic solvent]
When the following conditions are all met, you can execute Plasma Correction on Startup, but you cannot execute Plasma Correction in other situations.
Tune Way: [Auto Tune]
Plasma Mode: [Low Matrix] or [General Purpose]
Cell Gas: No Gas mode or He mode (except for HEHe mode)
When startup tasks run in helium mode, note that the sensitivity in helium mode is lower than no gas mode. Therefore, in the default startup settings, the startup tasks may complete with a low sensitivity error. We recommend changing [Monitored Masses] from “7” to “59” for [Resolution/Axis] and [Torch Axis], and “80” to “40” for EM.
The following describes how to execute a Startup using the User Tune in the case of Organic Solvent Analysis as an example.
Click [Settings] from the [Settings] group on the [Tools] tab.
The [Settings] dialog box appears.
Click
 at the side of [Hardware] from the
[System] category.
at the side of [Hardware] from the
[System] category.Select [Organic solvent] in “Ignition Mode” from the [Plasma] category.
Set the instrument to Standby Mode.
Click [User Tune Configuration] from the [Startup] group in the Task Navigator.
The User Tune Pane is displayed.
Select [Custom Tune] from the toolbar.
Select the organic solvent you want to use from the [Organic Solvent Parameters] drop-down list on the toolbar.
Check the message, and then click [OK].
The tune modes of the selected organic solvent are imported in the User Tune pane.
Click the [Override Hardware Settings] button on the toolbar.
Various parameters related to the hardware settings are displayed. You can edit the parameters.
- Click [Startup Configuration] from the [Startup] group in the Task Navigator.
- Click [Configure Ignition Sequence] on the Startup
Pane toolbar.
The [Configure Ignition Sequence] dialog box is displayed.
Select [User Tune], and then click [OK].
After plasma ignition, the User Tune is imported and used in the Startup task.
Click
at the side of [Selected Options]
from the [Options] category in the [Settings]
dialog box.Enable [User Tune] in [System Function].
Check [Set Base Tune for Startup] on the toolbar.
For example, when you want to use s-lens only in Hot mode, specify [<none>] as the [Base Cool Tune Mode].
Click [Startup Configuration] from the [Startup] group in the Task Navigator.
Click
 on the toolbar.
According to the tuning solution to be used, set [Monitored Masses] for each item. Also, specify [Vial #].
- User Tune Configuration] from the [Startup] group in the Task Navigator.
Click
on the toolbar.The [Set Acq Parameters for Manual Sensitivity Tune] dialog box is displayed.
According to the tuning solution to be used, enter masses.
After plasma ignition, run Startup.
To display the [Startup] group, click [Configuration] from the [Startup] group on the [Home] tab.
An ![]() icon
appears in front of the hardware setting parameters. These parameters
can be edited here, and will be used for any acquisition (not specific
to any tune mode or any batch).
icon
appears in front of the hardware setting parameters. These parameters
can be edited here, and will be used for any acquisition (not specific
to any tune mode or any batch).
If the User Tune does not run, change the settings as follows.
To display the [Startup] group, click [Configuration] from the [Startup] group on the [Home] tab.
The Startup Pane is displayed.
To display the [Startup] group, click [Configuration] from the [Startup] group on the [Home] tab.
The User Tune pane is displayed.
To use the User Tune
To use User Tune, complete the following steps:
Start MassHunter Workstation, select the [User Tune] in the [Load Option] on [ICP-MS MassHunter Workstation] dialog box.
This can also be set in the [Configure Ignition Sequence] dialog box.
Global Tune
The Global Tune is a common tune mode that can be used for any batch acquisition. You can configure the Global Tune in the User Tune pane.
To configure the Global Tune, complete the following steps:
- User Tune Configuration] from the [Startup] group in the Task Navigator.
Click the
on the toolbar.The [Import Tune Modes from Existing Batch] dialog box is displayed.
Select an existing batch in which the tune modes are imported. Select items ([Add If Not Exist]/[Replace All Tune Modes]/[Same Tune Modes Only]) to be imported. Click the [Import] button.
The tune modes of the selected batch are imported in the User Tune pane.
Turn on the [Set as Global Tune] button on the toolbar.
Click [New] from the [Batch] group on the [Home] tab.
The [New Batch Folder] dialog box is displayed.
Enter a new batch name, then click [Create].
In the case of global tune mode, make sure to create a new batch folder. A new batch cannot be created from a preset method or existing batch.
In the case of global tune mode, "Will Be Updated with Global Tune" is displayed beside each tune category (Plasma, Lenses, and Cell etc.) which will be imported from User Tune in Tune Modes Pane. All tune modes cannot be edited and are gray out. Editing of tune mode name, adding/removing of tune mode, and changing of tune mode cannot be done either. These parameters' values will be updated by the values in User Tune when the batch is queued.
Click [Import from Existing Batch] on the [File] tab.
Select the batch to be used for acquisitions, and then click [Open].
The [Select Batch Contents] dialog box is displayed.
Select the contents to be imported, and then click [OK].
The tune parameters of the Global Tune are imported into the new batch.
Save the batch, add the batch to the Queue, and then start the acquisition.
To display the [Startup] group, click [Configuration] from the [Startup] group on the [Home] tab.
The User Tune Pane is displayed.
Or, click [Set as Global Tune] from the [Tune] group on the [Home] tab to enable the button.
When the batch is sent to the Queue, the User Tune is updated and the tune report of the latest User Tune is copied to the batch.
Lens Auto Tune for Startup
In User Tune, you cannot specify tune modes that allow auto tune along with tune modes that do not allow auto tune. Lens auto tune can only be performed when all tune modes originate from preset methods.
When [User Tune] is selected as the [Load Option], the lens auto tune for Startup executes all tune modes specified in User Tune.
You can set a stabilization time in the [Stabilization Time] text box from the tool bar in the User Tune pane.
[Auto Tune]/[Custom Tune] from the toolbar in the User Tune pane allow you to specify the tune method for the lens tune that is executed in Startup/hardware settings. When [Auto Tune] is selected, autotuning is performed during Startup. Otherwise, semi-autotuning is performed.
To Get Here
- Click [User Tune Configuration] from the [Startup] group in the Task Navigator. To display the [Startup] group, click [Configuration] from the [Startup] group on the [Home] tab.