Using Standard QC Error Action Functions in ICP-MS MassHunter 4.2 or later
The terms "AOF", "Action on Failure", and "Action Failure" have been changed to "Error Action" in MassHunter 4.4.
Introduction
Prior to the release of ICP-MS MassHunter 4.1, MassHunter QC functionality included the ability to set QC limits and failure flags on many common QC criteria such as internal standard or QC sample recovery and stability, calibration linearity and range, sample measurement precision (CPS %RSD) and blank concentration. However, unless the optional Intelligent Sequencing software was enabled, it was not possible to set automatic Error Action actions to be executed for a QC failure. Intelligent sequencing enabled automatic QC Error Action functions and provided a much more powerful and flexible QC checking capability, but at the same time introduced more complexity than many labs required for simple QC checking and automated Error Action. To meet the needs of those labs that do not require sophisticated QC Error Action functions, but do require some automated functionality, the standard Fullquant Outlier functions of MassHunter 4.2 were enhanced to add additional QC checks, and simple Error Action capability on QC failure.
New QC Checks
MassHunter 4.1 allows three independent QC sample types to be configured with independent control limits. MassHunter 4.2 has added two additional QC Samples for a total of five.
In addition, MassHunter 4.2 has added the ability to automatically calculate spike recoveries with the addition of two additional sample types, Spike ref and Spike. These new sample types allow the user to set spike amounts for each analyte element and calculate the % spike recovery compared to the unspiked reference sample. Unlike Intelligent Sequencing, no sophisticated filtering of flagging or Error Action based on the relative concentration of the spike to spike reference sample is possible.
Configuring FullQuant Outlier with QC Error Action
QC Error Action can be configured from either Instrument Control or Data analysis, depending on whether you are creating a new acquisition batch from scratch, or adding QC Error Action functionality to an existing batch. The steps are the same, though the user interface to select some functions differs slightly. Both methods are demonstrated in the following tutorial.
To open the Batch File you want to configure, click [Open Folder] from the [Batch] group on the [Home] tab in the [ICP-MSICP-QQQ MassHunter] window or [ICP-MSICP-QQQ Data Analysis] window.
- From the [ICP-MSICP-QQQ Data
Analysis] window
Click [Edit] from the [Method] group on the [Home] tab to open the [Method Editor] window.
Under the Method Development Tasks pane on the left of the screen, click [QC Setup] from the [Advanced Info] group.
The FullQuant Outlier Setup pane is displayed.
- From the [ICP-MSICP-QQQ
MassHunter] window
Click [QC] from the [Acquisition] group in the Task Navigator.
The FullQuant Outlier Pane is displayed.
The available QC check items are displayed as shown below.
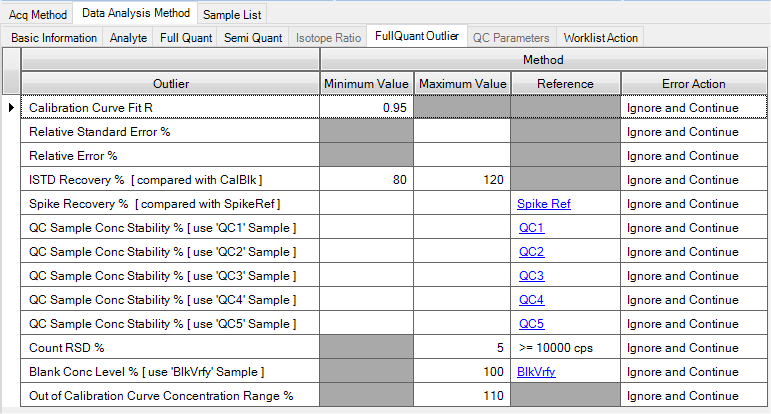
You can enter control limits for each QC item. In most cases they are percentages compared to the Reference value. These entries should be self-explanatory. The blue hyperlinks in the Reference column lead to the Calibration pane, where the actual reference values can be entered for each Reference type as shown below. For example, the reference (expected) value for QC1 is set to 5 ppb for all 4 analytes in the table below. The spike amount is also set to 5 ppb for each analyte. However, there is no requirement for the values to be the same for different analytes.

After completing the required reference information in the calibration pane (above), click “FullQuant Outlier” on the Method Development Tasks pane again to return to the previous pane.
QC Sample Types
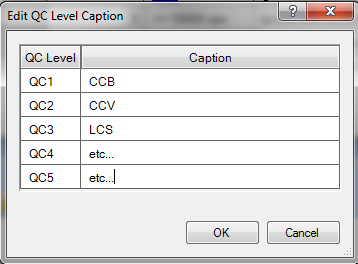
The 5 QC sample types (QC1 – QC5) can be used for any QC check that has an expected lower and upper control limit. They can be renamed to reflect their functionality, or to conform to regulatory requirements or standard operating procedures. For example, they could be named CCB, CCV, LCS, etc. To rename them, click the [Edit QC Level Caption] button above the Outlier table.
The following dialog box is displayed allowing you to assign a name to each of the five QC samples. In this example, QC1 was named CCB etc. Click [OK] to accept your changes.
Error Action options
There are four simple actions that can be automatically executed during sample analysis if a QC check is out of your specified range. These are shown below.
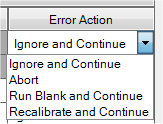
They are mostly self-explanatory with one exception. “Recalibrate and Continue” requires that your sample list is set up in Block Mode, meaning that you have designated a calibration block containing your calibration standards in order.
This is set up from Instrument Control when creating the sample list for the batch. Click the [Use Block List] button at the top of the Sample List Pane (Sequence).

The sample list layout changes from the default format which shows all samples in the batch in order, to the Block List format which shows the samples grouped into blocks of related sample types. The default (empty) block list is shown below.
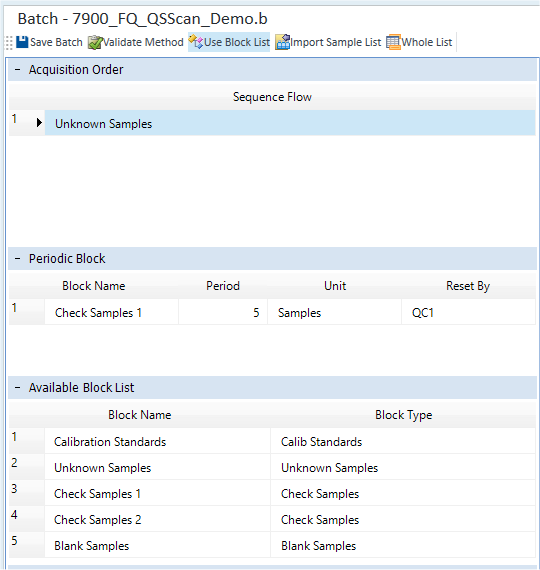
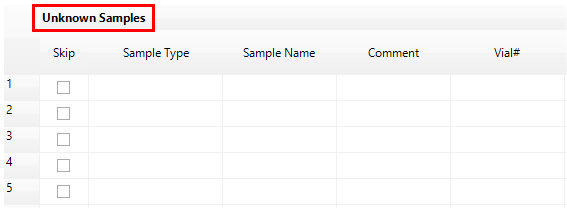
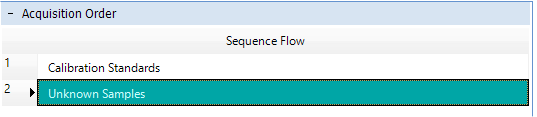
The list of blocks to be analyzed in order is listed in the top section under Sequence Flow. The default as shown is only the Unknown Samples block. When this block is highlighted as shown, the sequence table displayed to the right contains the samples in this block, as shown below.
To execute the Error Action “Recalibrate and Continue”, a calibration block must be defined and added to the Sequence Flow table. To do this, right click anywhere in the Unknown Samples blank area.

Select [Add Line] from the list. A second line is added to the Acquisition Order list. Click on the first line to enable a pull-down arrow on the right which allows you to select the block type. Select “Calibration Standards” to create a calibration block, which will be the first group of samples to be analyzed. Fill in the table to the right labeled Calibration Standards with your entire calibration set, including the calibration blank, calibration standards, and any additional calibration checks you might want to run automatically if a recalibration occurs, such as an initial calibration blank (ICB) and initial calibration verification (ICV) standard. This entire list is re-run if the Error Action “Recalibrate and Continue” is executed.
You have now correctly configured QC error action. Save the Batch and add it to the Queue to run it.