Sample List Pane (Sequence)
This section describes the functions of the commands that are available in the Sample List Pane.
Enter the order of the sample acquisitions and vial positions in the sample list to set the auto acquisition sequence. The samples are acquired in the order that they appear in the sample list.
- Title Bar
- Sample List Toolbar
- Context Menu
- Sample Table
- [Acquisition Order] Table
- [Periodic Block] Table
- [Available Block List] Table
- [Information] Table
- To Get Here
Title Bar
The title bar buttons and the context menu have the same functions as the Title Bar on the Instrument Status Pane.
Sample List Toolbar

 Drag to move the toolbar.
 If
you are using more than one block list, set this to ON. When this is set
to ON, the Block List view is displayed.
If
you are using more than one block list, set this to ON. When this is set
to ON, the Block List view is displayed.
When is
off for a batch which has multi-Acquisition Order blocks, a confirmation
message is displayed to confirm whether block lists can be merged into
one process block. If you want to merge, is set to
off, and samples from other acquisition blocks are merged to the highest
level acquisition block.
 Imports the
sample list from another file.
Imports the
sample list from another file.
 This is displayed in Block List view. Displays the
entire sample list. The list cannot be edited. Click this item again to
restore the list.
This is displayed in Block List view. Displays the
entire sample list. The list cannot be edited. Click this item again to
restore the list.
 Opens the [Add/Remove
Columns] dialog box, which lets you select the columns to display
in the sample list.
Opens the [Add/Remove
Columns] dialog box, which lets you select the columns to display
in the sample list.
Context Menu
This section describes the commands available in the context menu displayed by right-clicking on the tab when the Whole List is not displayed.
[Fill Down]
When this command is executed after you select multiple cells vertically, the value in the first cell is copied to the selected cells.
[Delete Line]
Deletes the selected line.
[Insert Line]
Inserts a line above the selected line.
[Insert Function]
The [Select Function] dialog box appears, which lets you select the function to be executed to add it to the sample list.
[Add/Remove Columns]
Opens the [Add/Remove Columns] dialog box, which lets you select the columns to display in the sample list.
[Change Rack Configuration]
Opens the [Change Rack Configuration] dialog box, which lets you customize the rack type of the autosampler to use in a batch.
[Merge Lots]
This item, which is available when the sample list is divided into some lots, merges the selected lot with the preceding lot. Lots are used in the optional Intelligent Sequence software functions.
[Copy]
Copies the selected row, column, or cell to the Clipboard.
[Paste]
Pastes the copied data to the cursor position.
[Print Sample List]
Prints the sample list for the current batch.
The Sample List is output in portrait format by default. If you want to change to landscape format, select [Settings] dialog box > [Report] > [Print Sample List in landscape format]
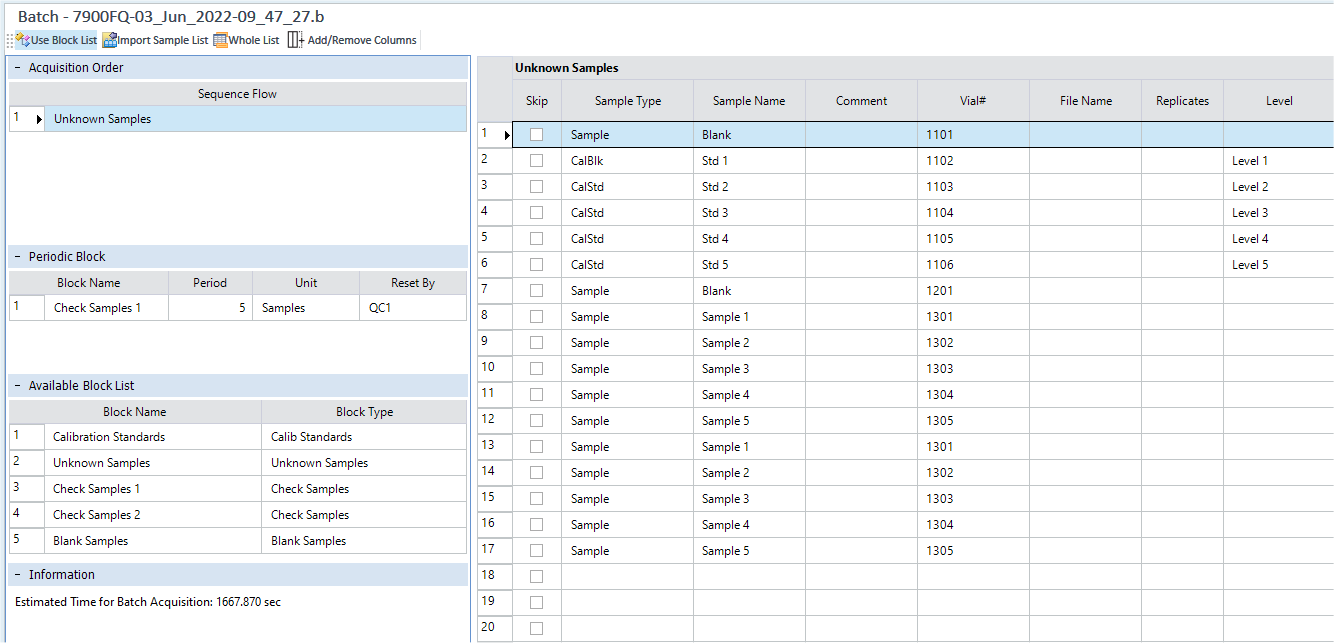
Sample Table
Set the acquisition sequence for each sample block in this table.
Acquisition is performed from top to bottom.
[Skip] Column
Select lines you want to ignore.
[Sample Type] Column
Select a sample type. For the meaning of each sample type, refer to Sample types. This is a required item.
[Sample Name] Column
Type a sample name if necessary.
[Comment] Column
Enter a comment if necessary.
[Vial#] Column
Sets the vial position. If the setting is inappropriate, the cell is displayed in red. This is a required item.
Even when Agilent LC or Agilent GC is used for the Sample Introduction, set the vial position here.
[Data File Name] Column
Enter a data file name or leave it blank to let, the system assign the file name. The name that the system assigns is a 3-digit number with the sample type suffix.
A 3-digit number is a run counter beginning at 001 for the first sample analyzed and incremented by 1 for each subsequent sample.
When the system writes the files to disk, it adds .d extension to the file name to indicate that it is a data file.
VVV: 3-digit run number (serial number from the first sequence)
SSSS: 4-digit suffix (fixed for each type)
The following strings cannot be used in file names (including extensions).
AUX, CLOCK$, COM0, COM1, COM2, COM3, COM4, COM5, COM6, COM7, COM8, COM9, CON, LPT0, LPT1, LPT2, LPT3, LPT4, LPT5, LPT6, LPT7, LPT8, LPT9, NUL, PRN
[Replicate] Column
In Spectrum mode, you can enter the number of repetitions (1 to 100) for each cell. If the acquisition mode is TRA mode, this item is set to "1" and cannot be changed.
While you can also set the number of repetitions on the [Acquisition Method] tab, the value set here takes precedence.
[Total Dil.] Column
You can enter a value directly. Or, when some values have already been entered in [Final Weight or Volume], [Sample Weight or Volume], or [Dilution Multiplier], the dilution factor is automatically calculated and displayed in the [Calculate Dilution Factor] dialog box, which is displayed when you double-click.
[Level] Column
Select a calibration curve level.
When the sample type is CalBlk, select "Level 1".
When the sample type is CalStd, select "Level 2", "Level 3",... in ascending order of concentration.
The following columns are displayed when all columns are added on the [Add/Remove Columns] on the toolbar.
[User Define 1]/[User Define 2]/[User Define 3] Column
You can enter data in these columns as needed. The data can also be output in a report.
[Sublist] Column
Select the sublist of the monitored masses. Add a sublist on the [Set Sublist of Acq Elements] dialog box, which is displayed when you double-click a cell.
Use this item when you do not need to acquire all masses that are specified in the acquisition method for some samples.
In the sublist, you can register only the masses that are specified in the acquisition method. You cannot add masses which are not specified in the acquisition method.
If you name the item when you register it in the sublist, you can select the named item from the list when you configure the settings of another sample.
[Error Action] Column
This item is displayed when the Intelligent Sequence software (optional) is used. To use the Intelligent Sequence software (optional), check [Intelligent Sequence] in the [Data Analysis Method] table in the Setup Pane.
To execute an action other than the action set in the data analysis in case of failure, select a process to be executed from the list.
The terms "AOF", "Action on Failure", and "Action Failure" have been changed to "Error Action" in MassHunter 4.4.
Select the actions for when a failure occurs.
NextSmpl:
Analyze the next sample
Abort:
Stop the sequence
Blk(Abort) - NextSmpl:
Analyze the next sample after analyzing a [BLANK] block. (Stop the sequence if the blank fails.)
Blk(Count) - NextSmpl:
Analyze the next sample after analyzing a [BLANK] block. (Continue the sequence even if the blank fails.)
Blk(Abort) - SameSmpl:
Analyze the same sample after analyzing a [BLANK] block. (Stop the sequence if the blank fails.)
Blk(Count) - SameSmpl:
Analyze the same sample after analyzing a [BLANK] block.
(Continue the sequence even if the blank fails.)
Cal - SameSmpl:
Analyze the same sample after regenerating [CALIB].
Cal - AllSmpls:
Analyze all samples beyond the last passing [CCV] block, after regenerating [CALIB].
NextLot:
Analyze the samples for the next lot. (A change in the lot is identified with the LotSep keyword.)
Run User Script:
Executes the user script selected in the dialog box.
If there is no script with that name, it does nothing.
SameSmple:
Simply re-analyze the same sample.
Reslope - NextSmpl:
Analyze the next sample after regenerating a calibration curve on a single DCS data. For the Y-intercept, multiply the previous calibration curve with the change in the coefficient of sensitivity.
The curve is created again only when the calibration curve is a linear expression. This error action can be set for DriftChk samples only.
AVS Dilute*5-SameSmpl
Measures the sample's 5X dilution. However, new data acquisition is not possible.
AVS Dilute*10-SameSmpl
Measures the sample's 10X dilution. However, new data acquisition is not possible.
AVS Dilute*20-SameSmpl
Measures the sample's 5X dilution. However, new data acquisition is not possible.
Dilute and Re-Run
This is available when using prepFAST for the autosampler or ADS 2 for the sample introduction.
If a sample analysis fails, the sample is diluted and analyzed again. If the sample is reanalyzed twice and the third analysis fails, the next sample is analyzed.
[ISTD Conc] Column
Set the ISTD concentration in the [Set ISTD Concentration] dialog box, which is displayed when you double-click a cell.
[Autodilution] Column
Set this item when using Autodilution in ADS 2. Set the automatic dilution factor within a range of 2.00 to 400. If you do not want to use automatic dilution, enter "1". The number of significant digits is 3.
To use automatic dilution with ADS 2, select [ADS 2] for [Sample Introduction] in the [Settings] dialog box.
[Dilution list] Column
Click on the right side of the cell to display the [Edit Dilution List] dialog box. Select the elements from the periodic table that will be used to determine the error action [Dilute and Re-Run].
The specified elements must match the name of the analyte.
If you do not set the [Dilution list], all analytes will be used to determine whether to perform an error action.
Elements for which the [Outlier] column in the Calibration Pane are off, or elements for which the [QC Check] column in the QC Parameters pane when using ”Intelligent Sequence Software” is off, will not be used for error actions regardless of this setting.
[Final Weight or Volume] Column
Enter the final weight or volume.
[Sample Weight or Volume] Column
Enter the sample weight or volume.
[Dilution Multiplier] Column
Enter the dilution multiplier.
When prepFAST is used for the Autosampler, the caption changes to [prepFAST Dilution] Column.
[Total Acq Time] Column
When [Pause at Batch End] on the Acquisition Queue pane tool bar is ON, and the queue is paused after an acquisition, the Sample List pane automatically becomes editable, and you can edit the total acquisition time. After editing, click the [Acquire sample] icon on the Sample List pane tool bar to start the acquisition of the next sample. This function is useful when using laser ablation.
[Sample Position] Column
Specify the sample position. Use the 'x y z' format to indicate the sample position.
If the third-party peripheral is an autosampler, x is the tray number, y is the vial position (sequentially numbered from upper left to lower right) in the rack, and z is the sample depth.
If the third-party peripheral does not provide sample position information, enter the sample position using the keyboard.
You cannot use the [Fill Down] function in this column.
[%J] Column
This is used when you use USP<232>/ICH Q3D method in U.S. Pharmacopeial Convention.
The J value is the concentration (w/w) of the elements of interest at the Target limit, appropriately diluted to the working range of the instrument.
[Max. Daily Dose] Column
This is used when you use USP<232>/ICH Q3D method in U.S. Pharmacopeial Convention.
By default, the value is empty and does not influence the QC outlier calculations. If a value is assigned, the QC outliers calculated as:
Low Limit £ (Measured Conc × Total Dilution × Max. Daily Dose)/(Reference QC Conc) £ High Limit
[Acquisition Order] Table
If is turned
on, shows Block List View.
Set the acquisition order of the sample blocks. A sample block is a set of acquisitions grouped in a category. While it is possible to configure a sequence with one sample block, multiple sample blocks are used, for example, to group standard solutions and samples.
If you click a sample block, the Sample Table on the right side is replaced with the table of the selected sample block and you can configure detailed settings.
When is
off for the batch which has multi-Acquisition Order blocks, a confirmation
message is displayed to confirm whether block lists can be merged into
one process block. If you want to merge, is set to
off, and samples from other acquisition blocks are merged to the highest
level acquisition block.
Changing the Acquisition Order
Drag a sample block to change the order.
Adding a Sample Block
To add a sample block, select [Add Line] from the context menu.
From the list for the added line, select the type of the sample block.
Deleting a Sample Block
To delete a sample block, select the sample block then select [Delete Line] from the context menu.
Types and Functions of Sample Blocks
[Calibration Standards]
Sample block for creating a calibration curve.
[Unknown Samples]
Sample block for analyzing unknown samples.
[Blank Samples]
Sample block for analyzing blank samples.
[Check Samples]
Set a sample block for performing QC checking. For example, set a sample whose sample type is CCV or CCB.
[Periodic Block] Table
Set a sample block to analyze for each sample acquisition or to analyze periodically. To add a setting line, select [Add Line] from the context menu.
[Block Name]
Select a sample block from the list.
[Period]
Double-click a cell to enter the period. Set the unit in [Unit] below.
[Unit]
If you analyze for each sample, select [samples] from the list and if you analyze periodically select [hours].
[Reset by]
Select a sample type for which the count or time is reset.
[Available Block List] Table
Define the sample block names for the batch. The sample blocks that are shown in this table can be set in the [Acquisition Order] and [Periodic Block] tables.
[Information] Table
[Estimated Time for Batch Acquisition]
Since this value does not count the time required in the movement to the vial position, actual acquisition time is longer than this value.
To Get Here
- Click [Sample List] from the [Sequence] group in the Task Navigator.