Acquisition Queue Pane
This section describes the functions in the Acquisition Queue pane.
Title Bar
The title bar buttons and the context menu have the same functions as the Title Bar of the Instrument Status Pane.
Toolbar

Drag  to move the toolbar.
 Deletes the selected task.
 Moves the order of the selected task down by one
level.
Moves the order of the selected task down by one
level.
 Moves the
order of the selected task up by one level.
Moves the
order of the selected task up by one level.
 Skips the warm-up time.
 Pauses the
queue after completing the acquisition of a batch.
Pauses the
queue after completing the acquisition of a batch.
When ON, the queue pauses without executing the [Vial# at End:] or [Plasma Off at End] function on the tool bar. To execute these functions, resume the queue by clicking [Resume] from the [Acquisition Queue] group on the [Home] tab.
 When selected,
the plasma is turned OFF after all tasks are completed.
When selected,
the plasma is turned OFF after all tasks are completed.
 MassHunter
automatically adds and executes a Performance Report task in the Queue
at the end of the Queue when all of the following conditions are met.
MassHunter
automatically adds and executes a Performance Report task in the Queue
at the end of the Queue when all of the following conditions are met.
- This button is enabled.
- There is no next queue task.
- The last queue task is Batch.
- The sample introduction type is [PeriPump], [AVS], or [Other].
- The plasma ignition mode is [Aqueous Solution].
You can change the Performance Check items in the [Performance Check Settings] dialog box.
 If this icon
is selected, when the name of the data file is the same as that of an
existing data file, the current data file overwrites the existing data
file. If this icon is not selected, an error message is displayed and
the acquisition stops.
If this icon
is selected, when the name of the data file is the same as that of an
existing data file, the current data file overwrites the existing data
file. If this icon is not selected, an error message is displayed and
the acquisition stops.
 When the icon
is ON, the acquisition does not start until you click
When the icon
is ON, the acquisition does not start until you click  on the Real Time Display Pane.
This function is enabled when acquisition parameters are used to select
the elements to be monitored.
on the Real Time Display Pane.
This function is enabled when acquisition parameters are used to select
the elements to be monitored.
 Set the vial position to which the probe is moved
after all tasks are complete.
Set the vial position to which the probe is moved
after all tasks are complete.
If you select <Select Vial>, the [Select
Vial] dialog box appears, which lets you set the vial position
on the autosampler. If you select <No Move>, the vial position is
set to that of the last task.
The warming up time after plasma ignition is set for each item of hardware settings or a batch as follows.
Hardware Settings |
Warm-up time for x-Lens [min] |
Warm-up time for s-Lens [min] |
|---|---|---|
Torch Axis |
10 |
10 |
EM |
10 |
10 |
Plasma Correction |
15 |
30 |
Standard Lenses Tune |
20 |
30 |
Resolution / Axis |
30 |
30 |
Performance Report |
20 |
30 |
Full Spectrum |
20 |
30 |
P/A Factor |
10 |
10 |
Hardware Settings |
Warm-up time for x-Lens [min] |
Warm-up time for s-Lens [min] |
Warm-up time for m-Lens [min] |
|---|---|---|---|
Torch Axis |
10 |
10 |
10 |
EM |
10 |
10 |
10 |
Plasma Correction |
15 |
30 |
30 |
Standard Lenses Tune |
20 |
30 |
30 |
Resolution / Axis |
30 |
30 |
30 |
Performance Report |
20 |
30 |
30 |
Full Spectrum |
20 |
30 |
30 |
P/A Factor |
10 |
10 |
10 |
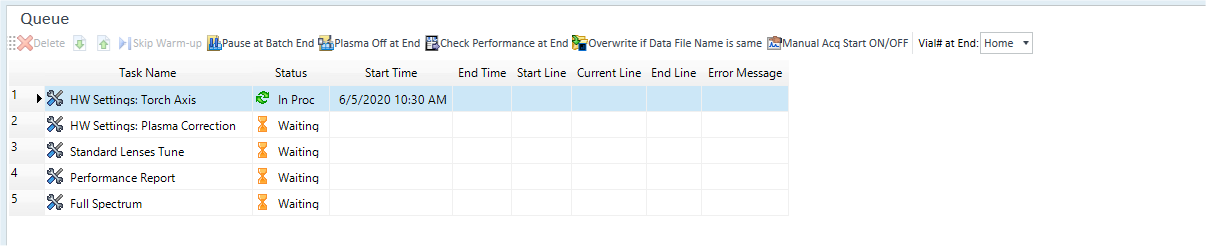
Pane Functions
The table displays the tuning tasks and batch tasks that are currently specified in the Queue. The table displays the status of the tasks during execution.
[Task Name]
Displays the task name.
[Status]
Displays the status of each task.
If a hardware error occurs, data acquisition and the entire Queue stop.
[Start Time]
Displays the start time of a task. For the task already started, the exact start time is displayed. For the task to be started, the estimated start time is displayed.
[End Time]
Displays the end time of a task. For a task that is done, the exact end time is displayed. For a task that is not done, the estimated end time is displayed.
[Start Line]
Displays the Start Line and the sample group name for the batch. This item is blank for hardware setting and autotuning.
[End Line]
Displays the End Line and the sample group name for the batch. This item is blank for hardware setting and autotuning.
[Current Line]
Displays the Current Line and the sample group name for the batch. This item is blank for hardware setting and autotuning and also before the batch starts.
[Error Message]
Displays an error message if an error occurs.
[Plasma Off on Error]
This column is not displayed by default. To use this column, add it through [Add/Remove Columns] in the context menu.
Select to turn off the plasma when an error occurs.
[Queued Date-Time]
This column is not displayed by default. To use this column, add it through [Add/Remove Columns] in the context menu.
Displays the date and time when a queue is executed.
Context Menu
This section describes the commands that are available in the context menu displayed when you right-click on the pane. The commands that are not listed below have the same function as their counterparts on the toolbars.
[Stop]
Pauses the Queue engine.
[Resume]
Resumes the Queue engine.
[Move Upper]
Moves the order of the selected task up by one level.
[Move Lower]
Moves the order of the selected task down by one level.
[Delete]
Deletes the selected task.
[Add/Remove Columns]
Opens the [Add/Remove Columns] dialog box where you can select the columns to display in the Queue list.
[Auto Fit Columns]
Adjusts the column width to fit the length of the text string.
[Copy]
Copies the selected row, column, or cell to the Clipboard.
[Export Table]
Opens the [Export Table] (Entire Table) dialog box where you can export the entire table. This command is available when a pane that includes a table is selected.
[Export Selected Area]
Opens the [Export Table] (Area) dialog box where you can export the data selected in the table. This command is available when a range of cells in the table is selected.
[Print]
Opens the [Print] dialog box where you can print the contents of the selected pane.
[Print Preview]
Opens the [Print Preview] dialog box where you can display the print preview.
To Get Here
- Click [Acquisition Queue] from the [Queue] group in the Task Navigator.