Setup Pane
This section describes the functions of the commands that are available in the Setup pane.
Title Bar
The title bar buttons and the context menu have the same functions as the Title Bar of the Instrument Status Pane.
Toolbar
Common Toolbar during Batch Acquisition
This toolbar is displayed on the following pane during batch acquisition.
- Setup Pane
- Tune Modes Pane
- Element Selection Pane
- Sample Introduction Pane
- Monitor Pane
- Sample List Pane (Sequence)
- Sample List Pane (Queue)
 /
/ This button is only displayed
when the currently opened batch is in a queue. You can select the following
buttons from the list:
This button is only displayed
when the currently opened batch is in a queue. You can select the following
buttons from the list:
This allows you to queue the currently opened batch
by renaming it by adding “_#X” as a suffix. For example, “test.b” is requeued
as “test_#2.b”. The parameters are the same as the original.
This allows
you to edit the current opened batch. Click this button to automatically
skip columns for all samples in the list that are selected. This also
automatically jumps to the Sample
List Pane (Sequence) and then changes to  . When
the editing the batch is completed and is clicked,
the batch is saved and added to the Queue.
. When
the editing the batch is completed and is clicked,
the batch is saved and added to the Queue.
 This button
is displayed if the currently opened batch has been acquired in the Queue
task. Click this button to edit the acquired batch. When the user is editing
the batch,
This button
is displayed if the currently opened batch has been acquired in the Queue
task. Click this button to edit the acquired batch. When the user is editing
the batch,  is
displayed in red and bold, and Queue task is paused. When you finish editing
the batch, click this button to save the batch and return to batch acquisition.
is
displayed in red and bold, and Queue task is paused. When you finish editing
the batch, click this button to save the batch and return to batch acquisition.
 Cancel editing the batch, and return to batch acquisition.
Pane Functions
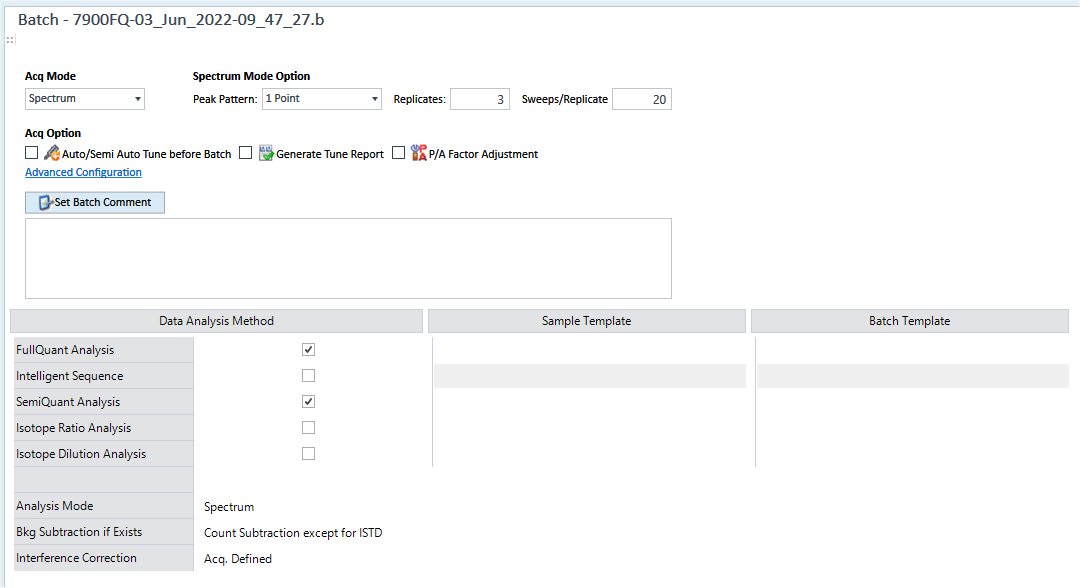
[Acq Mode]
Select an acquisition mode.
[Spectrum]
Select this option to acquire data in Spectrum mode. In this mode, mass spectra (plots of the signal intensity for each mass) are acquired. Select this mode for qualitative, semiquantitative, or quantitative analysis. In a qualitative analysis, usually the mass is changed continuously from 2 to 260 and the mass spectra within this range are generated. In a quantitative analysis, only certain masses are analyzed and corresponding mass spectra are generated.
When the Scan Type is [MS/MS], the range of monitored masses is 2 to 260 for Q1 and 2 to 275 for Q2.
[TRA]
Select this option to acquire data in Time Resolved Analysis mode. In this mode, a timechart (chronological plot of the signal intensity) is acquired. Select this mode when the signal intensity changes over time, for example, in an application that combines the instrument with peripheral equipment, such as the Laser Ablation or a Chromatograph.
In TRA mode, you can perform up to 90,000 seconds (25 hours) of acquisitions.
As data processing takes longer in prolonged acquisitions, change the settings as follows.
Click [Settings] from the [Settings] group on the [Tools] tab.
The [Settings] dialog box appears.
Click
 at the side of [Selected Options]
from the [Options] category
at the side of [Selected Options]
from the [Options] category- Set the following options in the [Data Handling] category.
- Select [Data Acquisition without DA].
- Select [Tabulate Chart after Sample Acquisition], and then select data format and type.
[Peak Profile]
Select this to confirm the peak shape. You can set only one tune mode.
When multiple tune modes are set in a batch, if this mode is selected, the [Select Tune Mode] dialog box is displayed. Select a tune mode to use and click [OK].
Single Particle Analysis
Displayed when you open a batch in Single Particle Analysis. You cannot change Acq Mode.
[Spectrum Mode Options]
This table is displayed when Spectrum mode is selected.
[Peak Pattern]
[Q2 Peak Pattern]
Set the number of points to be measured.
The spectrum acquisition is performed within the range between -0.5 and +0.5 amu of the mass. This acquisition range is divided into 20 points (in increments of mass 0.05). The number of acquisition points can be specified for the analysis.
For TRA mode, this is always set to [1 point] and is not displayed.
[1 Point]
Only the middle point is acquired.
[3 Point]
The middle point and the points just before and after the middle point are acquired. Select this option for quantitative analysis.
[6 Point]
Evenly-selected 6 points are acquired. Select this option for qualitative analysis.
[20 Point]
Selects all acquisition points. Select this option to plot the most detailed spectral shape.
[Peak Profile Mode]
This item is displayed when [Peak Profile] is selected for [Acq Mode]. Select a mode for acquisition.
[Q1 Profile]: Acquires the Peak Profile of Q1 (front quadrupole).
[Q2 Profile]: Acquires the Peak Profile of Q2 (rear quadrupole).
[MS/MS Profile]: Acquires the Peak Profile of MS/MS.
[Replicate]
Enter the number of repetitions (1 to 100) in replicated analyses. For TRA mode, this item is not displayed and is always set to "1".
[Sweeps Replicate]
Set the sweeps count (an integer between 1 and 10000) per acquisition in replicated acquisitions. Usually, set it to "100" for spectrum analysis.
Set it to "10000" when precision of isotopic information (including isotopic ratio and isotope dilution) is required (such as radioactive isotope analysis for determining age).
[Acq Option]
[Auto/Semi Auto Tune before Batch] check box
Automatically executes Autotuning or custom tuning before a batch is executed in the queue. Set the tuning solution at the position of Vial# applied to [Performance Report] for Hardware Setting (normally Vial# for Standard Setting) in the Startup pane.
[Generate Tune Report] check box
Select to generate the tune report.
[P/A Factor Adjustment] check box
Select to automatically adjust the P/A factor while the batch is running. The automatic adjustment of P/A factors uses the samples, such as CalBlk and CalStd, which are intended for calibration curves. In most cases, CalStd measured with analog signals is used. Keep in mind that it takes time to perform the initial setting for the P/A adjustment in each tune mode before measuring CalBlk or CalStd in the beginning of the batch.
Overview of the Behavior in Batch Acquisition
The current P/A factors saved in the hardware settings are restored to their default values.
When the solution specified for CalStd is acquired, if an analog signal can be obtained from an element, the element is used for a P/A adjustment. For other elements, interpolated P/A factors are calculated.
After that, in the CalStd solution, even if an analog signal is obtained from the same element as above, nothing is performed for the element. If an analog signal is obtained from another element, the element is used to adjust the P/A factors.
The P/A factors updated in the batch are stored in the hardware settings and can be used for acquisitions of other batches.
[Advanced Configuration] link
Click this link to display the [Configure Batch Acquisition] dialog box where you can make detailed settings for the batch acquisition.
[Set Batch Comment]
When the user clicks the [Set Batch Comment], Batch Comment enters editing mode and you can edit the comment. Navigate out of the text box to leave editing mode.
[Data Analysis Method] table
See [Data Analysis Method] table.
[Sample/Batch Template] table
See [Sample/Batch Template] table
To Get Here
- Click [Setup] from the [Acquisition] group in the Task Navigator.