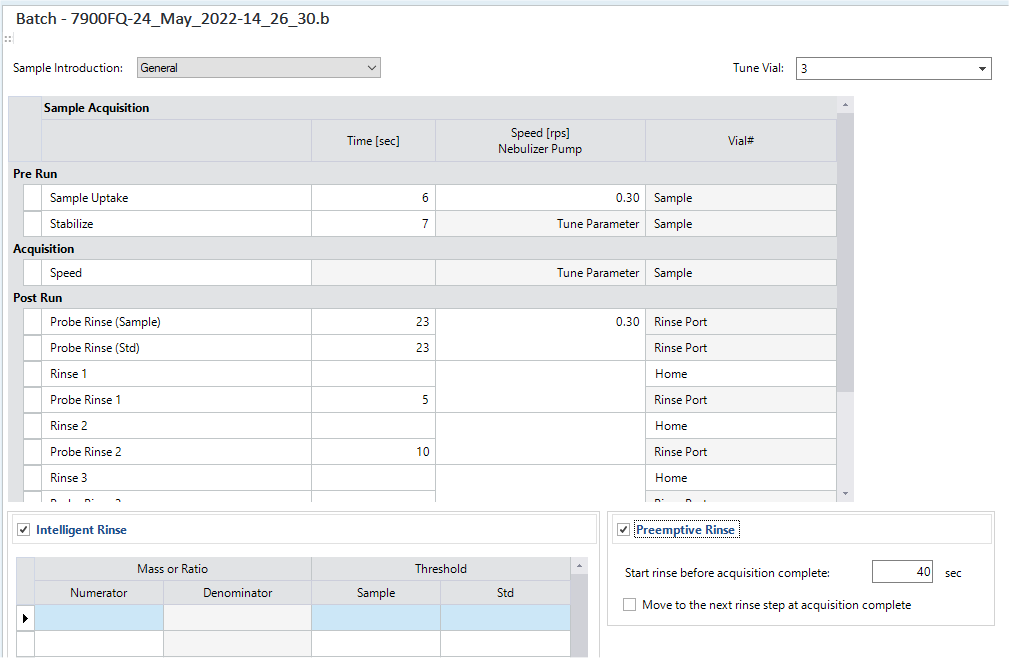
Sample Introduction Pane
This section describes the functions of the commands that are available in the Sample Introduction Pane.
Configure the peripump/AVS. This item is not displayed when an LC, GC, or Laser Ablation is connected or when the sample introduction is not set. The sample introduction can be set in Sample Introduction on the [Settings] dialog box.
Title Bar
The title bar buttons and the context menu have the same functions as the Title Bar on the Instrument Status Pane.
Toolbar
Task Setting Toolbar

Drag  to move the
toolbar.
to move the
toolbar.
 : [Condition
Calculator] dialog box is displayed. Displayed when [Discrete Sampling]
(AVS) or [Autodilution] (ADS 2) is selected in the [Sample
introduction] list .
: [Condition
Calculator] dialog box is displayed. Displayed when [Discrete Sampling]
(AVS) or [Autodilution] (ADS 2) is selected in the [Sample
introduction] list .
Context Menu
This section describes the commands that are available in the context menu displayed when you right-click on the pane. The commands that are not listed below have the same function as their counterparts on the toolbars.
[Copy]
Copies the selected row, column, or cell to the Clipboard.
[Export Table]
Opens the [Export Table] (Entire Table) dialog box where you can export the entire table. This command is available when a pane that includes a table is selected.
[Export Selected Area]
Opens the [Export Table] (Area) dialog box where you can export the data selected in the table. This command is available when a range of cells in the table is selected.
[Print PeriPump/AVS]
Prints the PeriPump/AVS parameters in the current batch.
Setup Table
[Sample Introduction] List
Select a sample introduction mode.
When ISIS 2/AVS/ADS 2 is not set, only [General] can be selected.
When ISIS 2 is set, you can select [General], [High Sample Throughput], [Discrete Sampling], or [Hydride Generation]. However, [Autodilution] cannot be selected in MassHunter 5.3 or later. To use ISIS, select [ISIS] for Sample Introduction on the [Settings] dialog box.
When AVS is set, [General], or [Discrete Sampling] can be selected. If [General] is selected, data using carrier solution for sample flow can be acquired. In this case, usual normal PeriPump table is shown in the Sample Introduction pane. The acquisition is run when the AVS pump is stopped, following the PeriPump parameters, selecting [Load] as valve, and selecting [ISTD] as [Tune/ISTD Valve]. To use AVS, select [AVS] for Sample Introduction on the [Settings] dialog box.
When ADS 2 is set, you can select [General] or [Autodilution].
[Tune Vial]
This vial is used when continuing with Auto Tune (including Semi-Auto Tune) and the Generate Tune Report functionality. The PeriPump program and the AVS program (Prerun and Postrun) on the PeriPump/AVS are also used for the Auto Tune and Generate Tune report functions.
In previous versions, the parameters for Performance Report in Hardware Settings are used for auto tune and tune report. These are always used for parameters in the batch.
When Auto Tune is being executed and you want to skip the moving prove and PeriPump/AVS program, go to the [Start Auto Tune] dialog box, and then turn on the [Skip PeriPump/AVS program]. When the tune report is being created and you want to skip the moving prove and PeriPump/AVS program, go to the [Generate Tune Report] dialog box, and then turn on the [Skip PeriPump/AVS program].
Sample Acquisition Table
The items and settings that are displayed depend on the selected sample introduction. Gray cells cannot be set.
[Time] Column
Enter the time (0 to 9999 sec).
If you enter 0 or leave it blank, this step is skipped.
[Speed Nebulizer Pump] Column
Enter the rotation speed (0 to 0.5 rps) of the nebulizer pump.
If you enter 0 or leave it blank, this step is skipped.
[Speed AVS PeriPump] Column
This item is displayed when ISIS 2 is used and lets you set the rotation speed (0 to 1.0 rps) of the peripump.
If you enter 0 or leave it blank, this step is skipped.
[Speed AVS PeriPump2] Column
This item is displayed when ISIS 2 is used and lets you set the rotation speed (rps) of the peripump 2.
If you enter 0 or leave it blank, this step is skipped.
[AVS Uptake Pump] Column
This item is displayed when AVS is used and lets you set the speed (0 to 100 %) of the uptake pump.
If you enter 0 or leave it blank, this step is skipped.
[Vial#] Column
Set the vial position when you use the autosampler.
You can set [HOME] position from the dropdown menu. In other cases, click [<Vial#>] to open a dialog box, and then select a vial in the dialog box. You can directly enter a vial number from the keyboard into the [<Vial#>] column.
[Valve] Column
The valve position is displayed when [Discrete Sampling] is selected in the [Sample Introduction] List.
[Common]
[Carrier Speed]
This item is displayed when [Discrete Sampling] is selected in the [Sample Introduction] List.
Enter the peripump speed to load the carrier solution. It is a constant speed at all times.
[Reductant Speed]
This item is displayed when [Hydride Generation] is selected in the [Sample Introduction] List.
Enter the peripump speed to load the reductant. It is a constant speed at all times.
[Pre Run]
[Sample Uptake]
Sets the uptake time and uptake speed before acquisition.
[Sample Load]
This item is displayed when [Discrete Sampling] or [Autodilution] (ADS 2) is selected in the [Sample Introduction] List.
Enter the peristaltic pump speed for loading the sample. The valve is in the LOAD position during the Load Time. This value depends on the size of the sample loop. Minimum sample volume also depends on the size of the sample loop.
[Stabilize]
Set a stabilization time before starting the signal acquisition after sample uptake.
[Acquisition]
[Speed]
Set the pump speed during an acquisition.
The following item is displayed when [Discrete Sampling] (AVS) or [Autodilution] (ADS 2) is selected in the [Sample Introduction] List.
[Probe Rinse (Sample)]
After the acquisition of samples, enter the probe rinse time at the rinse port and the pump speed.
[Probe Rinse (Std)]
After the acquisition of the standard solution, enter the probe rinse time at the rinse port and the pump speed.
[Rinse1]
Enter the rise time, pump speed, and vial position for the external bottle 1.
[Probe Rinse1]
After Rinse1, enter the probe rinse time at the rinse port and the pump speed.
[Rinse2]
Enter the rise time, pump speed, and vial position for the external bottle 2.
[Probe Rinse1]
After Rinse2, enter the probe rinse time at the rinse port and the pump speed.
[Rinse3]
Enter the rise time, pump speed, and vial position for the external bottle 3.
[Probe Rinse3]
After Rinse3, enter the probe rinse time at the rinse port and the pump speed.
[Post Run]
If the Autosampler is SPS 4, Dual Port Rinse is supported. You can select [Rinse Port1] or [Rinse Port2] from the [Vial#] column. When you use Dual Port Rinse, you need to turn on Dual Port Rinse on the Rack tab in the [Configure Autosampler] dialog box.
[Probe Rinse (Sample)]
After the acquisition of samples, enter the probe rinse time at the rinse port and the pump speed.
[Probe Rinse (Std)]
After the acquisition of the standard solution, enter the probe rinse time at the rinse port and the pump speed.
[Rinse1]
Enter the rise time, pump speed, and vial position for the external bottle 1.
[Probe Rinse1]
After Rinse1, enter the probe rinse time at the rinse port and the pump speed.
[Rinse2]
Enter the rise time, pump speed, and vial position for the external bottle 2.
[Probe Rinse1]
After Rinse2, enter the probe rinse time at the rinse port and the pump speed.
[Rinse3]
Enter the rise time, pump speed, and vial position for the external bottle 3.
[Probe Rinse3]
After Rinse3, enter the probe rinse time at the rinse port and the pump speed.
[Rinse4]
This item is displayed when [General] is selected in the [Sample Introduction] List.
Enter the rise time, pump speed, and vial position for the external bottle 4.
[Probe Rinse4]
This item is displayed when [General] is selected in the [Sample Introduction] List.
After Rinse4, enter the probe rinse time at the rinse port and the pump speed.
[Opt Loop Probe Wash]
This item is displayed when [Discrete Sampling] or [Autodilution] (ADS 2) is selected in the [Sample Introduction] List.
Enter the rise time and pump speed of the probe and sample loop.
[Opt Loop Probe Wash (Dilution)]
This item is displayed when [Autodilution] (ADS 2) is selected in the [Sample Introduction] List.
Enter the rise time and pump speed of the ADS 2 dilution loop.
[Opt Loop Wash]
This item is displayed when [Discrete Sampling] or [Autodilution] (ADS 2) is selected in the [Sample Introduction] List.
If you reduce the acquisition time, samples may remain in the sample loop after the acquisition. Enter the rise time for rinsing it off and the vial position. If the acquisition time is long enough and no sample remains in the sample loop, enter 1 (sec).
[Auto tune] Table
This item is displayed when [Discrete Sampling] (AVS) or [Autodilution] (ADS 2) is selected in the [Sample Introduction] List .
Used when [Auto/Semi Auto Tune before Batch] check box is selected. This is operated in the same way as the [PeriPump Setting] dialog box.
[Intelligent Rinse] Table
Mark the check box when an intelligent rinse is performed after an acquisition. If it is marked, the setup table is displayed.
In Intelligent Rinse, rinsing continues until the signal intensity or intensity ratio of masses in the sample or standard solution decreases to the specified threshold or lower.
[Ch] column
Displays the channel number that is set in the [Set Acq Parameters for Manual Sensitivity Tune] dialog box.
[Q1] column
Set a Q1 mass to monitor.
The masses to be monitored can be entered directly in a cell or can be set on the mass table displayed by clicking the right side of a cell.
[Mass or Ratio]
[Q2 Masses or Ratio]
[Numerator]
Displays the masses to be monitored.
Displays the Q2 masses to monitor.
You can enter the masses to monitor directly in a cell or set them on the [Select Monitored Masses] dialog box cell.
[Denominator]
Displays a mass to use as the denominator when you monitor the intensity ratio. You can enter the mass for the denominator directly in a cell or set them on the [Select Monitored Masses] dialog box, which is displayed when you click the right side of a cell and select Select Mass.
[Threshold]
[Sample]
Enter the threshold (CPS) for sample acquisition.
[Std]
Enter the threshold (CPS) for the analysis of standard solutions.
[Time window]
Enter the time required to monitor the acquired value. If the acquisition average during the measuring period is below the threshold, finish the rinse. If it does not fall below the threshold, perform the action defined in "Error Action".
[Error Action]
Select the action to take if the threshold value is not reached within the time specified.
The terms "AOF", "Action on Failure", and "Action Failure" have been changed to "Error Action" in MassHunter 4.4.
[Apply to]
Select a rinse step to which the setting is applied.
[Preemptive Rinse] Table
This item is not display when [Discrete Sampling] or [Autodilution] (ADS 2) is selected in the [Sample Introduction] List.
Mark the check box to start the (preemptive) rinse before the end of acquisition. If it is marked, the setup table is displayed.
[Start rinse before a acquisition complete]
Enter the number of seconds before the end of acquisition to start the rinse.
[Move to the next rinse step at acquisition complete]
When marked, the preemptive rinse stops and the probe moves to the next rinse step when the acquisition is complete.
The rinse solution may be introduced during acquisition. Be very careful if you specify preemptive times. Keep in mind Threshold values are not monitored during acquisition when Intelligent Rinse is performed through preemptive rinse. To proceed with Intelligent Rinse, set a preemptive time so that the rinse step selected as the Intelligent Rinse target finishes after acquisition ends.
[Print report]
Mark the check box to have the report print on a printer.
Even if the data is not printed out, the data is saved.
To Get Here
- Click [Sample Introduction] from the [Acquisition] group in the Task Navigator.