Element Selection Pane
This section describes the functions of the commands that are available in the Element Selection Pane.
Title Bar
The title bar buttons and the context menu have the same functions as the Title Bar on the Instrument Status Pane.
Toolbar
Task Settings Toolbar


 Drag to move the toolbar.

 Displays the [Select
Elements on Periodic Table] dialog box where you can set elements
and interference correction equations. This button is displayed in bold
red text if there is no analyte selected.
Displays the [Select
Elements on Periodic Table] dialog box where you can set elements
and interference correction equations. This button is displayed in bold
red text if there is no analyte selected.
 Displayed in Single Particle Analysis. When the
[Select RM Mass]
dialog box is displayed, you can set the element name and the mass
of the Reference Material.
Displayed in Single Particle Analysis. When the
[Select RM Mass]
dialog box is displayed, you can set the element name and the mass
of the Reference Material.
 Displays only the selected tune mode.
Context Menu
This section describes the commands that are available in the context menu displayed when you right-click on the pane. The commands that are not listed below have the same function as their counterparts on the toolbars.
[Fill Down]
When this command is executed after you select multiple cells vertically, the value in the first cell is copied to the selected cells.
[Copy]
Copies the selected row, column, or cell to the Clipboard.
[Paste]
Pastes the copied data to the cursor position.
[Delete]
Deletes the selected data. This command is available when a cell in an editable table is selected.
[Export Table]
Opens the [Export Table] (Entire Table) dialog box where you can export the entire table. This command is available when a pane that includes a table is selected.
[Export Selected Area]
Opens the [Export Table] (Area) dialog box where you can export the data selected in the table. This command is available when a range of cells in the table is selected.
[Print Acq Parameter]
Prints the Acq parameters in the current batch.
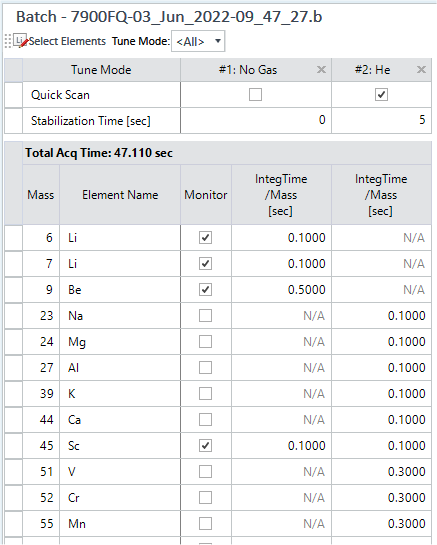
Setup Table
Set the masses and integration time.
In the Setup Table, the values in cells can be copied and pasted in the same way as the cell operations in Excel.
You can delete a line by selecting the left edge of the line and then clicking [Delete] in the context menu. If all tune modes are displayed, the selected line is deleted from all tune modes. If you filter tune modes by using the [Tune Mode] box on the toolbar, the line is deleted only from the tune modes currently displayed.
If you filter tune modes by using the [Tune Mode] box on the toolbar, the lines that contain a cell that displays "N/A" are not displayed.
[Tune Mode]
Displays the tune modes to use. The tune modes are done sequentially from the left, and after the acquisition is completed, the leftmost tune mode is selected.
To change the order that the tune modes are done during acquisition, drag the cell that displays the tune mode name to the left.
Click [X] in the column header to display a deletion confirmation message. Click [OK] to delete the tune mode.
Right-click in the column header to display the following context menus:
[Rename Tune Mode]
Lets you change the name that is displayed in the header of the tuning mode.
[Configure Tune Modes]
Opens the [Configure Tune Modes] dialog box, which lets you copy or delete the tuning mode.
[Copy Tune Parameters]
Opens the [Copy Tune Parameters] dialog box, that allows you to copy the tune parameters.
[Quick Scan]
This option is displayed when Spectrum mode is selected.
The full spectra across all masses are acquired for use in the subsequent analyses such as a qualitative analysis. The Quick Scan can be used only in one tune mode. We recommend that you use He mode, which has relatively small interference effects.
[Independent P/A Factors]
This item is displayed when [Independent P/A Factor] is selected in the [Options] category in the [Settings] dialog box.
Select this option to use P/A Factors automatically adjusted for each tuning mode during acquisition. When this option is not selected, P/A Factors in the P/A Factor Setting Pane on the Dashboard pane are used.
[Stabilization Time]
Set a time to let the signal stabilize when the tune conditions change, before acquiring data. You can set the [Stabilization Time], if the [Tune mode stabilization time] in the [Configure Batch Acquisition] dialog box is enabled in TRA mode.
This shows messages with following conditions in TRA mode.
Description of validation |
Conditions |
|||
Tune mode |
Gas mode |
Stabilization time |
||
7800, 7900, 8900 |
7700, 8800 |
|||
Show error message for short stabilization time. |
#2 and the following |
No gas mode |
< 15 sec |
< 30 sec |
Gas mode |
< 5 sec |
< 10 sec |
||
The expected tune stabilization time for H2 mode depends on the previous tune mode in the Agilent 7900. You can expect a shorter tune stabilization time when H2 mode is NOT placed after No gas mode or He mode.
[Resolution]
This item is displayed when [Half Mass Acquisition] is selected in the [Options] category in the [Settings] dialog box. You can select either [Standard] or [Narrow Peak]. The mass resolution of Narrow Peak is half of the Standard resolution. This is used in combination with +0.5 half mass measurements. If there is a mass for [+0.5] in the table, [Narrow Peak] is specified.
This item is not displayed when the acquisition mode is TRA mode.
[Scan Type]
Select a scan type.
[MS/MS]: Does an MS/MS scan.
[Single Quad]: Does a Single Quad scan.
[Element Name] Column
Displays the element names.
[Monitor] Column
Select the masses whose count values are displayed in the Real Time Display Pane during an acquisition.
[Mass] Column
Displays the masses.
To set masses, double-click the cell. The [Select Elements on Periodic Table] dialog box is displayed and allows you to set elements and interference correction equations.
[Mass] Column
Displays the masses when [Scan Type] is [Single Quad].
To set masses, double-click the cell. The [Select Elements on Periodic Table] dialog box is displayed, which lets you set elements and interference correction equations.
[Q1->Q2] Column
Displays the masses of Q1 and Q2 when [Scan Type] is [MS/MS].
To set masses, double-click the cell. The [Select Elements on Periodic Table] dialog box is displayed, which lets you set target elements and interference correction equations.
In MassHunter 4.3 or previous versions, the timed-program TRA was limited t a maximum of 12 mass numbers. There are no limitations in MassHunter 4.4 or later.
The only limitation on TRA in MassHunter 4.4 or later is the total acquisition time.
Error message |
MassHunter 4.4 or later |
Number of all points beyond the following range: 1 <= all points <= 12 |
Removed |
Total acq time is outside the following range: 20 sec <= total acq time<= 90000 sec |
Removed |
Total acq time is outside the following range: 1 sec <= total acq time <=90000 sec |
Applied |
Set Acq Time of Tune <Tune name> to 15sec or more |
Added |
[+0.5] Column
This item is displayed when [Half Mass Acquisition] is selected in the [Options] category in the [Settings] dialog box.
When this is selected, a mass with a mass number equal to the acquired mass plus 0.5 is also acquired. This is used in combination with the Narrow Peak resolution.
However, when [Peak Profile] is selected for [Acq Mode], this function cannot be used.
[Integ Time/Mass[sec]] Column
Set the integration time per mass. To set the same value in consecutive lines, select [Fill Down] from the context menu.
To set masses, double-click the cell.
Depending on the peak patterns (especially 3 or 6 points), an approximation for the input value is obtained. When the integration time "per mass" is calculated, the integration time "for one point of a peak pattern" is calculated and multiplied by the number of points for the peak pattern. For 3 or 6 points, the value is indivisible and rounded during the calculation.
[Detector Mode] Column
This item is displayed when [Forced Analog Detector Mode] is selected in the [Options] category in the [Settings] dialog box. You can select either [Auto] or [Analog] for the detector mode. When [Auto] is selected, the detector mode switched automatically between Pulse mode and Analog mode. If both Analog-mode and Pulse-mode measurements are used in acquisition of the same elements, you need to adjust the P/A factors. If Analog mode is enough to perform an acquisition (for example, when the concentration is sufficiently high), select [Analog].
[Sampling Period]
This item is displayed when TRA mode is selected as the acquisition mode. Displays the data sampling period. You cannot change the value.
For nano particle application, the minimum sampling period for TRA is reduced from 3 msec to 0.1 msec. Due to this change, the time resolution of acquired data is changed from 0.5 msec to 0.01 msec.
Fast TRA acquisition works when acquisition parameters meet the following conditions:
- Single mass pair is specified.
- Integration time is less than 10msec.
The multitune in the Fast TRA mode is supported from MassHunter 4.4 or later.
To use the Fast TRA mode on Agilent 7800, click [Fast TRA mode (for 7800)] on the [Optional Software] Tab screen in the [ICP-MS MassHunter Activation] dialog box.
integ. Time [ms] : t |
7800 w/o option |
7800 w/ option |
10[ms] < t |
TRA |
TRA |
3[ms] ~ t < 10[ms] |
TRA |
Fast TRA |
0.1[ms] ~ t < 3[ms] |
Not supported |
Fast TRA |
t < 0.1[ms] |
Not supported |
Not supported |
[Acq Time]
This item is displayed when TRA mode is selected as the acquisition mode. Enter the total acquisition time. The acquisition time is adjusted to the integral multiple of the value of the [Sampling Period].
To Get Here
- Click [Element Selection] from the [Acquisition] group in the Task Navigator.