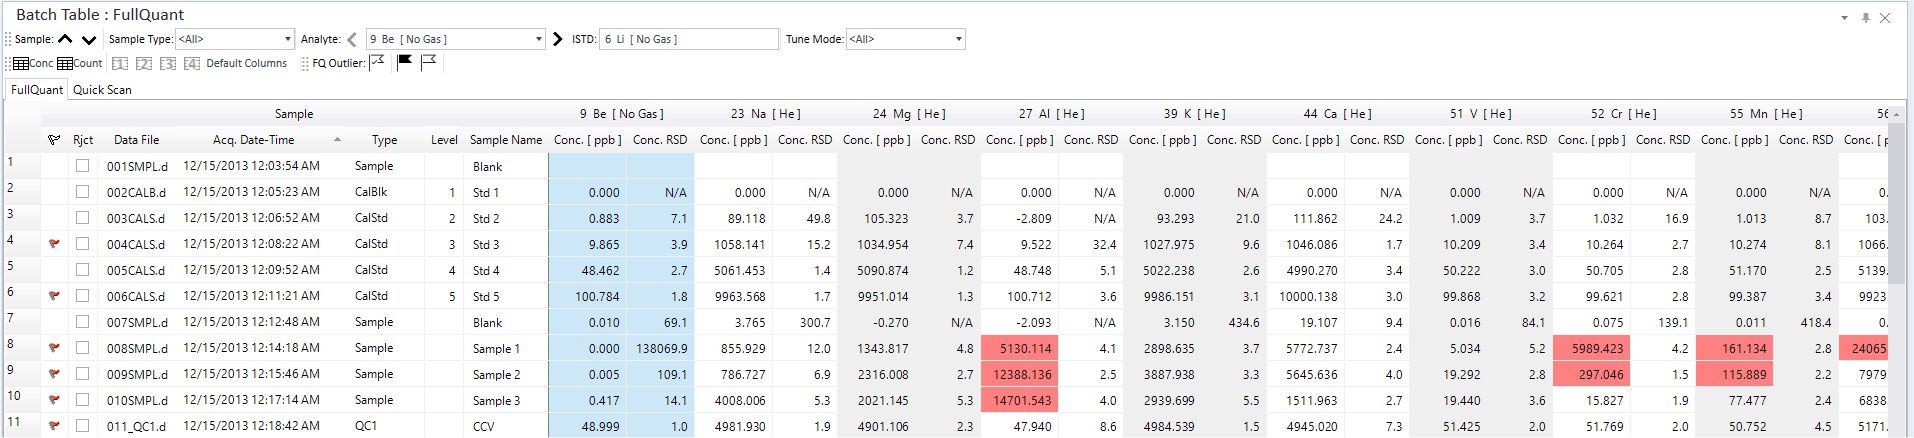
Batch Table pane
This section describes the functions of the commands that are available in the Batch Table pane.
For more detailed operations, refer to "Batch Table Pane Operation".
For information about the functions of each column, see "Batch Table Pane Operation".
- Title Bar
- Batch Table Toolbar
- User Column Setting Toolbar
- Outliers Toolbar
- Batch Table Tabs
- Context Menu
- To Get Here
Title Bar
The title bar buttons and the context menu have the same functions as the Title Bar of the Instrument Status Pane.
Batch Table Toolbar
This toolbar lets you select the sample type that is displayed in the Batch Table, and select the sample or element of interest.

 Drag to move the toolbar.
 Moves
the cursor to the previous sample.
Moves
the cursor to the previous sample.
 Moves the cursor to the next sample.
 Opens
the [Sample Type]
dialog box, which lets you select the sample type to show in the Batch
Table.
Opens
the [Sample Type]
dialog box, which lets you select the sample type to show in the Batch
Table.
 Moves the cursor to the selected element.
 Moves
the cursor to the previous element.
Moves
the cursor to the previous element.
 Moves the cursor to the next element.
 Displays the internal standard for the selected
element.
Displays the internal standard for the selected
element.
 For a sample that is analyzed in Multi Tune
mode, selects the Tune Mode to show data for in the Batch Table. Select
<All> to display all Tune Mode data.
For a sample that is analyzed in Multi Tune
mode, selects the Tune Mode to show data for in the Batch Table. Select
<All> to display all Tune Mode data.
User Column Setting Toolbar

Drag to move the toolbar.
 In Table mode, displays the analysis results
in concentration.
In Table mode, displays the analysis results
in concentration.
 In Detail mode, displays the analysis results
in count values.
In Detail mode, displays the analysis results
in count values.
 Switches to the column settings saved as Setting1
in the [Edit
User Columns Settings] dialog box.
Switches to the column settings saved as Setting1
in the [Edit
User Columns Settings] dialog box.
 Switches to the column settings saved as Setting2
in the [Edit
User Columns Settings] dialog box.
Switches to the column settings saved as Setting2
in the [Edit
User Columns Settings] dialog box.
 Switches to the column settings saved as Setting3
in the [Edit
User Columns Settings] dialog box.
Switches to the column settings saved as Setting3
in the [Edit
User Columns Settings] dialog box.
 Switches to the column settings saved as Setting4
in the [Edit
User Columns Settings] dialog box.
Switches to the column settings saved as Setting4
in the [Edit
User Columns Settings] dialog box.
 Restores
the default column settings.
Restores
the default column settings.
Outliers Toolbar
FullQuant Outliers Toolbar

 Opens the [FullQuant
Outliers] dialog box, which lets you select the type of outlier to
display in the Batch Table.
Opens the [FullQuant
Outliers] dialog box, which lets you select the type of outlier to
display in the Batch Table.
 Displays
samples that have an outlier in FullQuant.
Displays
samples that have an outlier in FullQuant.
 Displays
samples that do not have an outlier.
Displays
samples that do not have an outlier.
SemiQuant Outliers Toolbar

Opens the [SemiQuant
Outliers] dialog box, which lets you select the type of outlier to
be displayed in the Batch Table.
Displays
samples that have an outlier in SemiQuant.
Displays
samples that do not have an outlier.
Batch Table Tabs
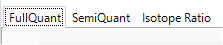
The tab for the selected Analysis Mode is displayed when the data analysis method is set to either “FullQuant Analysis”, “SemiQuant Analysis”, or “Isotope Ratio Analysis”.
If several Analysis Modes are selected, use these tabs to view the analysis results for each mode.
[FullQuant] Tab
Displays the quantitative analysis results.
[SemiQuant] Tab
Displays the semiquantitative analysis results.
The [Quick Scan] tab or [IntelliQuant] tab is displayed depending on the setting for the Method Table in the SemiQuant pane.
[Isotope Ratio] Tab
Displays the isotope ratio analysis results.
Context Menu
This section describes the commands that are available in the context menu. The commands that are not listed below have the same function as their counterparts on the toolbars and the Ribbon.
[Reset Sort]
Restores the default sorting order on a tabular pane.
[Reject Column For Replicate Data]
If the replicate data column is displayed, mark this option to display the Reject column which lets you select which replicate data to reject. The Reject column is hidden when this option is unchecked. To display the replicate data column, refer to “Displaying Replicate Data Columns”.
[Reject Settings]
Displays the [Reject Setting] dialog box, which lets you set the replicate data to be removed from the selected samples.
[Set as ISTD Reference File]
Sets the selected sample as the ISTD reference file.
[Reset ISTD Reference File]
If an ISTD reference file is set, resets the file.
[Correction Equation]
Displays the [Correction Equation - Acq Defined] dialog box, which lets you add/edit the correction equation.
[Export]
[Export Table]
Opens the [Export Table] (Entire Table) dialog box where you can export the entire table. This command is available when a pane that includes a table is selected.
[Export Selected Area]
Opens the [Export Table] (Area) dialog box where you can export the data selected in the table. This command is available when a range of cells in the table is selected.
[Export Table with Transposition]
Transposes Batch Table rows and columns and displays them.
[Fill Down]
When this command is executed after you select multiple cells vertically, the value in the first cell is copied to the selected cells.
[Page Setup]
Opens the [Page Setup] dialog box where you can configure the page settings for printing.
[Print]
Opens the [Print] dialog box where you can print the contents of the selected pane.
[Print Preview]
Opens the [Print Preview] dialog box where you can display the print preview.
To Get Here
- Open the batch result in the [ICP-MSICP-QQQ Data Analysis] window.
- Click [Return to Batch-at-a-Glance] from the [Validate/Return] group in the Method Development Tasks pane in the [Method Editor] window.
- Select [Panes] - [Batch Table] from the [Show] group on the [View] tab in the [ICP-MSICP-QQQ Data Analysis] window.