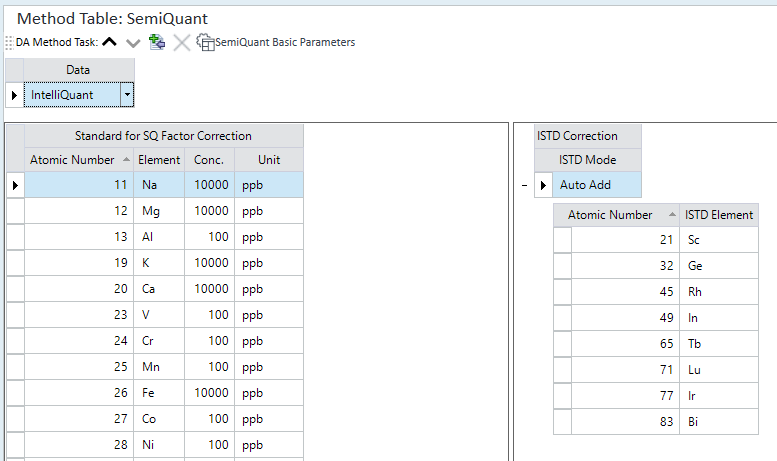
SemiQuant pane
Sets the analysis parameters when SemiQuant Analysis is selected in the Data Analysis Method table.
- Method Toolbar
- Method Table
- Standard for SQ Factor Correction Table
- ISTD Correction Table
- Context Menu
- To Get Here
For formulas see: Reference > Equations > SemiQuantitation.
Method Toolbar

 Drag to move the toolbar.
 Displays
the settings for the previous basic method task.
Displays
the settings for the previous basic method task.
 Displays the settings for the next
basic method task.
Displays the settings for the next
basic method task.
![]() Opens the
[Elements] dialog box.
You can add elements for the SemiQuant factor correction.
Opens the
[Elements] dialog box.
You can add elements for the SemiQuant factor correction.
 Deletes
the selected element.
Deletes
the selected element.
 Opens
the [SemiQuant
Basic Parameters] dialog box allowing you to set the basic parameters
SemiQuant Factor, Base Mass, and Reported Mass for each batch.
Opens
the [SemiQuant
Basic Parameters] dialog box allowing you to set the basic parameters
SemiQuant Factor, Base Mass, and Reported Mass for each batch.
The configured parameter applies to the Data Analysis method, but does not apply to the global SemiQuant Basic Parameters.
Method Table
Data
Select the [IntelliQuant], [Quick Scan], or [Main Data] as the data to use in semiquantitation.
IntelliQuant
When [IntelliQuant] is selected for [Data], semiquantitation is automatically performed using Quick Scan data. Additionally, the IntelliQuant pane is displayed in the Data Analysis window, and you can check each element's concentration and interference level in the periodic table.
If [iQ Rating] in the [Batch Options] group on the [Home] tab of the Batch Table Pane is turned off, the [IntelliQuant] tab is displayed on the Batch Table tab.
Quick Scan
When [Quick Scan] is selected for [Data], the [Quick Scan] tab is displayed on the batch table tab. Semi Quant outliers are displayed in the Batch Table on the [Quick Scan] tab. Also, the SemiQuant Factor pane is displayed in the Data Analysis window.
Main Data
If all masses have been selected in the acquisition method setting, select Main data. Here, also specify the tune mode.
Standard for SQ Factor Correction Table
Sets the elements and the concentrations of the standard sample (SQStd)
when you perform SemiQuant factor correction with a standard sample. To
add an element, click ![]() .
.
Before performing semiquantitative analysis, analyze the standard sample to correct the SemiQuant factor. Use a sample that contains known concentrations of three or four elements as a standard sample. The calibration standard can be matrix matched to make the analysis almost as accurate as full quantitative analysis. These concentrations of elements should cover the low, medium, and high ranges of the mass spectra.
Atomic Number
Displays the atomic number.
Element
Displays the element name.
Conc
Enter the concentration of the standard sample.
Unit
Lets you select one of the following units of concentration:
- ppm
- ppb
- ppt
- ug/ml
- ng/ml
- pg/ml
- mg/l
- ug/l
- ng/l
- mg/kg
- ug/kg
- ug/g
ISTD Correction Table
There are two modes of internal standard addition: Auto Add Mode and Normal Mode. The settings are not saved when you change the mode.
ISTD Mode
Before performing ISTD correction, select the ISTD Mode from the list.
- Auto Add
The Auto Add Mode is used when the internal standard is added automatically with a peristaltic pump (on-line ISTD addition). In this case, the precise internal standard (ISTD) concentration may not be known, but the ISTD concentration in every type of sample - calibration standard, a blank, an unknown sample, etc. - will be identical.
The following equations are used:
ISTD factor = (CPS of ISTD in the Internal Standard Data File) / (CPS of ISTD in the sample)
Conc. = (CPS in sample) x (ISTD factor) x (dilution factor) / (SemiQuant factor)
To use the Internal Standard Correction manually, a data file to be used as the Internal Standard Data File should be acquired prior to setting up the Internal Standard Correction. When a sequence is used, the Internal Standard Correction can be set as the [Type]. The solution should be either a blank or a calibration standard acquired using the online ISTD addition.
- General: Normal mode
The Normal Mode is used when the ISTD is added to the unknown sample only. This mode can also be used with Laser Ablation, where the matrix element is used as the ISTD. The ISTD factor is calculated from the SemiQuant factor, so no Internal Standard Data File is required for this mode.
The following equations are used:
ISTD factor = (SemiQuant Factor of ISTD) x (ISTD Concentration) / (CPS of ISTD in the sample)
Conc. = (CPS in sample) x (ISTD factor) x (dilution factor) / (SemiQuant factor)
Context Menu
This section describes the commands that are available in the context menu that is displayed when you right-click in the pane. The commands that are not listed below have the same function as their counterparts on the toolbars and the Ribbon.
[Export Table]
Opens the [Export Table] (Entire Table) dialog box where you can export the entire table. This command is available when a pane that includes a table is selected.
[Export Selected Area]
Opens the [Export Table] (Area) dialog box where you can export the data selected in the table. This command is available when a range of cells in the table is selected.
[Copy]
Copies the selected data to the Clipboard. When a tabular pane is selected, the selected row/column is copied.
[Paste]
Pastes the data copied with the Copy command.
[Reset Sort]
Restores the default sorting order on a tabular pane.
[Fill Down]
When this command is executed after you select multiple cells vertically, the value in the first cell is copied to the selected cells.
[Page Setup]
Opens the [Page Setup] dialog box where you can configure the page settings for printing.
[Print]
Opens the [Print] dialog box where you can print the contents of the selected pane.
[Print Preview]
Opens the [Print Preview] dialog box where you can display the print preview.
To Get Here
- When [SemiQuant Analysis] is set to On in the [Data Analysis Method] table, click [SemiQuant] from the [Set up Analysis Parameters] group in the Method Development Tasks pane.
- Click [SemiQuant] from the [Acquisition] group in the Task Navigator.