Executing Startup
Before starting analysis, optimize the instrument as described below.
You can run Startup and acquire data with your own tuning parameters. For more information, refer to the "User Tune Pane".
- Make sure that the instrument is in Standby mode.
In Analysis Mode, "Standby" is displayed in the Status Bar and the indicator in the [Status Viewer] dialog box and Instrument Status Pane in the [ICP-MSICP-QQQ MassHunter] window.
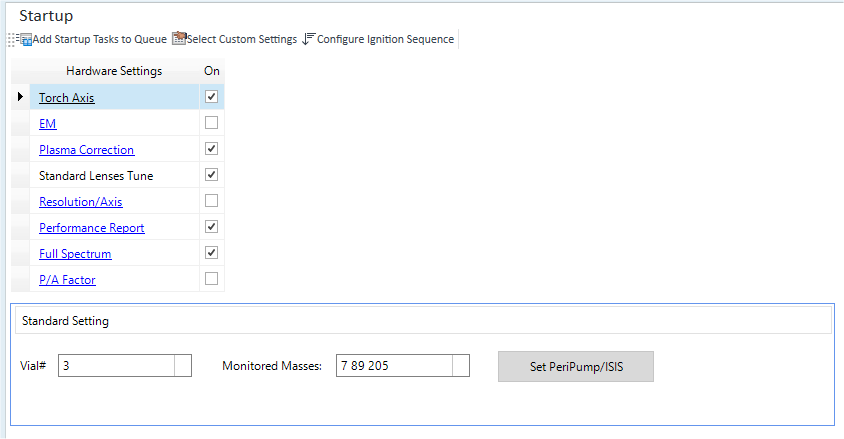
Click [Startup Configuration] from the [Startup] group in the Task Navigator.
Select the hardware items you want to adjust. Usually, select the torch axis, EM, plasma correction, standard lens tuning, resolution/axis, and performance report. Tune the P/A factors in each batch that you run. Standard Lenses Tune on this screen is a basic tuning and is different from the tuning mode that is used in each batch.
For more information about each item, see Startup Pane.
Set each item in the [Standard Setting] Table.
- [Vial#]: Sets the location of the vial that contains a tuning solution when the autosampler is used.
- [Monitored Masses]: Sets the mass number to be analyzed.
- [Set PeriPump/AVS]: Displays the [PeriPump Setting] dialog box, which lets you configure detailed settings when you use a peripump or AVS for sample introduction.
- Set the tuning solution.
- Click [Plasma] from the [Startup] group on the [Home] tab.
A confirmation dialog box is displayed.
- Click [Yes].
The instrument enters Analysis mode and starts the hardware setting automatically.
- Click [Add Startup Tasks to Queue] from the toolbar in the Startup Pane.
- Click [Acquisition Queue] from the [Queue] group in the Task
Navigator.
The Acquisition Queue Pane appears and displays the status and results of the startup.
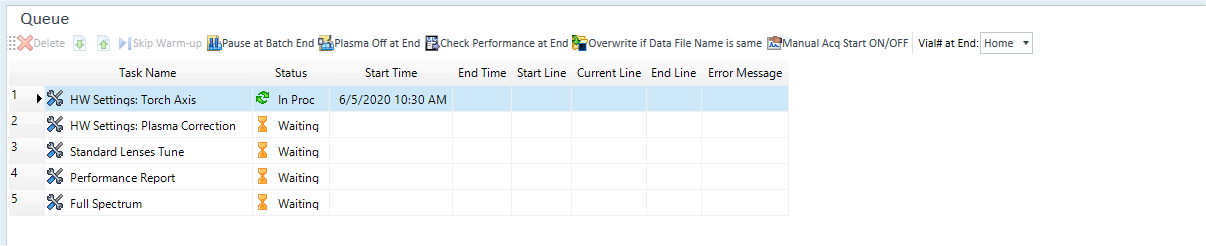
The Current Queue status, executed task and the status are displayed in the [Status Viewer] dialog box.
- Check the performance.
For more details, refer to the Performance Report.
To display the [Startup] group, click [Configuration] from the [Startup] group on the [Home] tab.
The Startup Pane appears.
Use the tuning solutions (Li, Y, Ce, Tl, 1 ppb each), including the followings:
For x-lens: |
Plasma Correction: Ce 1ppb |
|
For s-lens: |
Torch Axis: |
Li 1ppb (Cool) |
Plasma Correction: |
Ce 1ppb (Hot) Li, Co, 1 ppb each (Cool) |
|
Standard Lenses Tune: |
Co 1ppb (Cool) |
|
For m-lens: |
Plasma Correction: Ce 1ppb (Hot) |
|
Performance Report
After performing the hardware configuration, you can display/record the status of the instrument. This performance report is used to check/record the basic performance of the instrument
Click [Performance Report] from the [Hardware] group on the [Report] tab.
Starts measuring the performance.
When measuring is complete, performance information, tuning status, and meter values are displayed in each tab on the Performance Report Pane.

- [Performance]
Tab
Displays the result of a performance measurement.
- [HW
Setting/Tune Parameters] Tab
Allows you to configure hardware settings and displays the values and units of the tuning parameters. For information on each tuning parameter, refer to the Tune Modes Pane.
- [Meter]
Tab
Displays the value and unit of each meter. For information on each meter, refer to the descriptions in [Select Meter] dialog box.
-
Displays the sample introduction type, nebulizer type, and ion lens model. When [User Tune] is enabled in [Options] category in the [Settings] dialog box, [Tune Parameters] is displayed and the tune parameter methods (Standard Tune/User Tune) are displayed.
- [Performance]
Tab
When you click the [Generate] icon, the Performance Report is exported in PDF format.
MassHunter can automatically add and execute a Performance Report task in the Queue. For more details, refer to Acquisition Queue Pane.