Creating a Batch
The acquisition method, DA method, and sample list are stored in a single batch folder for each analysis. Before starting analysis, you need to create a new batch folder and configure settings for the acquisition method, DA method, and sample list.
Create a batch in one of the following ways:
- Using a Method Wizard to Create a Batch
- Using a Preset Method to Create a Batch
- Using an Existing Method to Create a Batch
- Creating a Batch from a Blank
When using ECM, OpenLab Server Products, Workstation Plus, or SDA, the displayed dialog box and the save file destination differ from standard MassHunter operations. For more information, refer to " Operations When Database Systems Are Used" in "Reference".
Using a Method Wizard to Create a Batch
The Method Wizard allows you to create a method by answering the questions displayed on the screen.
Follow the steps below to create a batch using the Method Wizard.
When using ECM, OpenLab Server Products, Workstation Plus, or SDA, the displayed dialog box and the save file destination differ from standard MassHunter operations. For more information, refer to " Operations When Database Systems Are Used" in "Reference".
Click [New] from the [Batch] group on the [Home] tab.
The [New Batch Folder] dialog box appears.
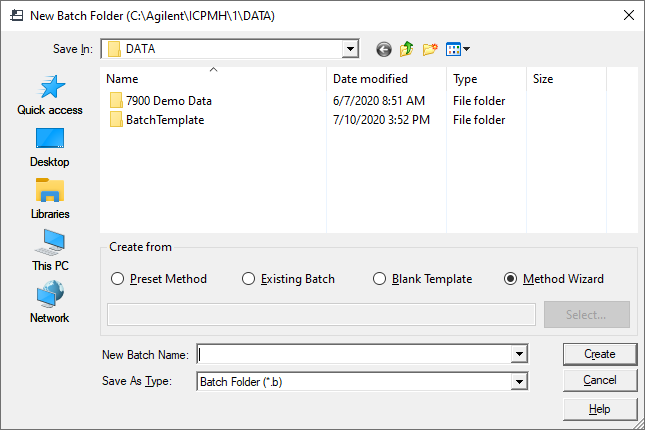
- In [Create from], select [Method Wizard].
- Enter a batch folder name, and then click [Create].
The [Welcome to ICP-MS MassHunter Method Wizard] dialog box appears.
- Follow the on-screen instructions to Configure the method.
The created method is displayed.
Click each menu from the [Acquisition] group in the Task Navigator to change the acquisition method if necessary.
For more information, see the references provided for each pane.
[Setup]:Set the acquisition mode and analysis mode on the Setup Pane.
[Tune Modes]:Set a tuning mode that will optimize the instrument for analysis with the batch on the Tune Modes Pane.
Click
 on
the toolbar. The basic performance is optimized during Startup. In
addition, by performing autotuning for each batch, you can optimize
other parameters for the corresponding acquisition.
on
the toolbar. The basic performance is optimized during Startup. In
addition, by performing autotuning for each batch, you can optimize
other parameters for the corresponding acquisition.[Element Selection]:Set the tune mode and mass numbers on the Element Selection Pane.
[Sample Introduction]:Set the peristaltic pump/AVS on the Sample Introduction Pane.
Click [Sequence] from the [Sample List] group in the Task Navigator to enter the order of the sample acquisitions and vial positions.
For information on setting up, refer to “Sample List Pane (Sequence)”.
Click each menu from the [Acquisition] group in the Task Navigator to change the data analysis method if necessary.
For more information, see the references provided for each pane.
[Analyte List]: Set the analytes for Timechart mode or Isotope Dilution analysis on the Analyte List Pane.
[Calibration]: Set the calibration curve parameters for FullQuant analysis on the Calibration Pane.
[SemiQuant]: Set each item for SemiQuant analysis on the SemiQuant Pane.
Also, the menu displayed differs according to the selected analysis mode. Set the data analysis method as necessary.
After completing the settings of all menus, click [Validation] from the [Batch] group on the [Home] tab.
If an error is found in the method, information about the error is displayed in the Method Error List Pane. Fix the errors.
If no error is found in the method, a confirmation dialog box is displayed. Click [OK].
To start the analysis, refer to " Executing the Queue".
The data analysis settings can also be configured after data acquisition. For more information, refer to "Operations on the [Data Analysis] Window".
When an error is found in the method, the acquisition cannot be started. Fix the error, and then start the acquisition.
Using a Preset Method to Create a Batch
This instrument has preset methods. To create a batch using a preset method, complete the following steps:
When using ECM, OpenLab Server Products, Workstation Plus, or SDA, the displayed dialog box and the save file destination differ from standard MassHunter operations. For more information, refer to " Operations When Database Systems Are Used" in "Reference".
Click [New] from the [Batch] group on the [Home] tab.
The [New Batch Folder] dialog box appears.
- In [Create from], select [Preset Method].
- Click the [Select] button.
The [Select Preset Method] dialog box appears.
- Double-click the preset method to use.
- Enter a batch folder name and click the [Create] button.
The created method is displayed.
Set the acquisition method, the data analysis method, and sample list if necessary. For more information, refer to step 5 to 7 in the ”Using a Method Wizard to Create a Batch” section.
After completing the settings of all menus, click [Validation] from the [Batch] group on the [Home] tab.
If an error is found in the method, information about the error is displayed in the Method Error List Pane. Fix the errors.
If no error is found in the method, a confirmation dialog box is displayed. Click [OK].
To start the analysis, refer to " Executing the Queue".
When an error is found in the method, the acquisition cannot be started. Fix the error, then start the acquisition.
Using an Existing Method to Create a Batch
Select this way if you load the acquisition method, data analysis method, and sample list from a batch already created.
When using ECM, OpenLab Server Products, Workstation Plus, or SDA, the displayed dialog box and the save file destination differ from standard MassHunter operations. For more information, refer to " Operations When Database Systems Are Used" in "Reference".
Click [New] from the [Batch] group on the [Home] tab.
The [New Batch Folder] dialog box appears.
- In [Create from], select [Existing Batch].
- Click the [Select] button.
The [Select Batch Folder] dialog box appears.
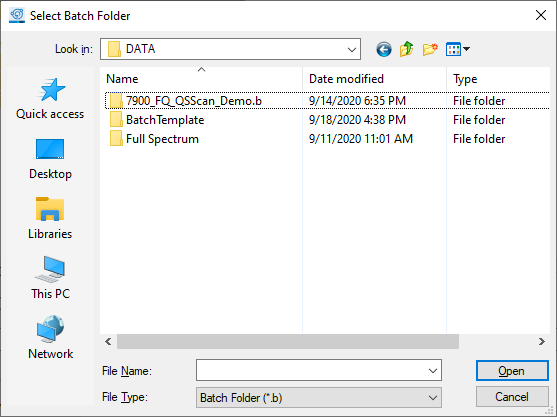
- Select a batch folder, then click [Open].
The [Select Batch Contents] dialog box appears.
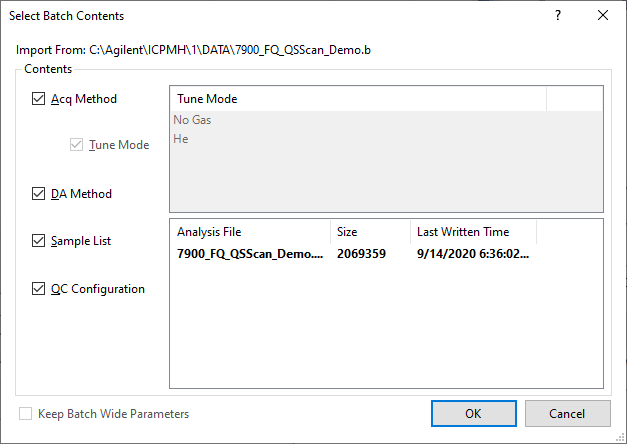
- Select the items to load into a new batch, then click [OK].
- Enter a batch folder name, then click [Create].
The created method is displayed.
Set the acquisition method, the data analysis method, and sample list if necessary. For more information, refer to step 5 to 7 in the ”Using a Method Wizard to Create a Batch” section.
After completing the settings of all menus, click [Validation] from the [Batch] group on the [Home] tab.
If an error is found in the method, information about the error is displayed in the Method Error List pane. Fix the errors.
If no error is found in the method, a confirmation dialog box is displayed. Click [OK].
To start the analysis, refer to "Executing the Queue".
The autotune can be selected only when the original batch is created from the preset method. For other cases, use the [Custom Tune].
Creating a Batch from a Blank
To create a new batch from a blank template, complete the following steps:
When using ECM, OpenLab Server Products, Workstation Plus, or SDA, the displayed dialog box and the save file destination differ from standard MassHunter operations. For more information, refer to " Operations When Database Systems Are Used" in "Reference".
Click [New] from the [Batch] group on the [Home] tab.
The [New Batch Folder] dialog box appears.
- In [Create from], select [Blank Template].
- Enter a batch folder name and click the [Create] button.
A blank method is displayed.
Set the acquisition method, the data analysis method, and sample list if necessary. For more information, refer to step 5 to 7 in the ”Using a Method Wizard to Create a Batch” section.
After completing the settings of all menus, click [Validation] from the [Batch] group on the [Home] tab.
If an error is found in the method, information about the error is displayed in the Method Error List Pane. Fix the errors.
If no error is found in the method, a confirmation dialog box is displayed. Click [OK].
To start the analysis, refer to "Executing the Queue".
When you create a batch from a blank method, tune using a Custom Tune.